https://pekiti.com/blogs/news.atomPekiti Tirsia International - PTI Blog2024-11-08T00:08:59-05:00Pekiti Tirsia Internationalhttps://pekiti.com/blogs/news/2025-learning-through-comparisons-big-blades-winter-camp2024-11-08T00:08:59-05:002024-11-16T11:27:27-05:002025 LEARNING THROUGH COMPARISONS “BIG BLADES” WINTER CAMPTuhon Bill McGrath
Train with six top instructors, including: Tuhon Bill McGrath, from Pekiti-Tirsia International. Punong Guro Marc Denny, from Dog Brothers Martial Arts. Coach Russ Mitchell, from the Winged Sabre School. Guro Bryan Cannata, from Kalis Americano. Dr. John Lennox, from the School of Two Swords. Sayaji David Daniel, from the American Bando Association.
2025 LEARNING THROUGH COMPARISONS “BIG BLADES” WINTER CAMP: March 1st & 2nd, 2025. Orlando, FL. U.S.A. .
Train with six top instructors, including: Tuhon Bill McGrath, from Pekiti-Tirsia International. Punong Guro Marc Denny, from Dog Brothers Martial Arts. Coach Russ Mitchell, from the Winged Sabre School. Guro Bryan Cannata, from Kalis Americano. Dr. John Lennox, from the School of Two Swords. Sayaji David Daniel, from the American Bando Association.
SAMPLE VIDEOS: Showing the curriculum for the camp.
VIDEO 1: Hungarian Hussar Saber: Basic Guard Stance, with Coach Russ Mitchell.
VIDEO 2: Thai long sword & Kicks. Dog Brothers Los Triques, with Punong Guro. Marc Denny: (Los Triques Dog Brothers Part 1)
VIDEO 3: Filipino short sword warm up from Pekiti-Tirsia, with Tuhon Bill McGrath.
VIDEO 4: Mountainman Bowie. An uniquely American style of Bowie knife combat with Guro Bryan Cannata.
VIDEO 5: Tomahawk & Knife. School of Two Swords, with Dr. John Lennox.
.
VIDEO 6: Basic Defensive Khukuri Drill, with Sayaji David Daniel.
Full seminar details below:
LOCATION: American Martial Arts Academy 9318 E Colonial Dr # B17 Orlando, FL 32817 407-208-9700 Inst: Eric Gianni Email: spartanamaa@gmail.com
SCHEDULE: Saturday: 3/1/2025 1. Hungarian military saber. Winged Sabre Historical Fencing. Inst. Russ Mitchell 2. Thai long sword & Kicks. Dog Brothers Los Triques: Inst. Marc Denny 3. Filipino short sword/Machete. Pekiti-Tirsia. Inst. Bill McGrath
Sunday: 3/2/2025 1. Bowie knife. Kalis Americano. Inst. Bryan Cannata. 2. Tomahawk. School of Two Swords. Inst. John Lennox. 3. Kukri. Bando Khukuri, Inst. David Daniel
Each day’s training will begin at 10am sharp and have 6 hours of training: two hours with each instructor, with short breaks in-between classes.
Cost: $125 per day until December 31, 2024 $150 per day starting January 1, 2025
If you are attending both days, then choose 2 in the Quantity box on your cart page.
EARLY BIRD SPECIAL: Purchase both days of camp by December 31st and you will receive the following training gear at the camp:
One Rattan stick approximately 36” long. (This will be used as long sword trainers for the Hungarian Saber and Thai Long Sword classes. Then cut down to approximately 24” long for the Filipino Short Sword class).
One of each of the following Cold Steel rubber/polymer trainers: CS Laredo Bowie Trainer, CS Trench Hawk trainer, CS Kukri trainer.
Coach Russ Mitchell, Hungarian Military Saber, from Winged Sabre Historical Fencing. Russ is a 30-year "HEMA Dinosaur" and Feldenkrais Method Practitioner, who has trained in a variety of eastern and western lineages. He is the founder of Winged Sabre Historical Fencing, where his teaching focuses on the Hungarian sabre and the Fokos Axe. Visit his YouTube channel: https://www.youtube.com/@russmitchellmovement/featured
Punong Guro Marc Denny: Thai Long Sword and Kicking, from Dog Brothers M.A. Los Triques. Marc is the founder and head instructor of the Dog Brothers Martial Arts organization. For more info on DBMA, visit: https://dogbrothers.com/
Tuhon Bill McGrath: Filipino Short Sword, from the Pekiti-Tirsia system. Bill started his training in Pekiti-Tirsia in 1975 at the age of 14. In 1994 Bill was promoted to the rank of Tuhon Guro (Chief Instructor) by Grandmaster Leo Gaje and founded Pekiti-Tirsia International in 1995 and has been teaching this system since 1979. His website: https://pekiti.com/
Guro Bryan Cannata, Bowie Knife, from Kalis Americano. Bryan is a US Army veteran, a classically trained saber fencer and has trained in several styles of FMA, along with traditional American Bowie fighting. He is the founder of Kalis Americano (a blend of HEMA and FMA) and the South Eastern Director for Medusa Edged weapon Systems as well as the Southern Representative for Western Piper Methods. Contact Bryan through his Facebook group "Atlanta Monthly Meet Up."
Dr. John Lennox, Tomahawk, from the School of Two Swords. John has trained in various forms of swordplay for over 40 years. Beginning with the katana, he later moved into the western weapon styles. He is a black belt in Kenpo, an instructor with the Historical Martial Study Society, and an expert level knife and tomahawk instructor for the School of Two Swords. Over the past few years he has focused on unarmed combat theory. His recent research includes Aztec, Mayan and Inca combat systems. Since 2006 he has been teaching at workshops all over the world, including the The Shenandoah Project, the Symposium on the Western Arts of Swordsmanship through History (S.W.A.S.H.) in Leeds, England, and numerous workshops in Scotland, England, Finland, Ireland, Belgium, Germany, Australia, Mexico and Canada. He is the author of Combat Theory: The Foundations of the Fight, and is the editor for the posthumous work of Colonel Dwight C. McLemore, The Dagger/Counter-Dagger Concepts of Joachim Meyer. He is routinely called in to colleges and universities for workshops on historical combat and stage combat. John holds a PhD in Theatre with cognate studies in historical fencing from Wayne State University. Website: https://schooloftwoswords.com/
Sayaji David Daniel, Kukri/Khukuri, from the American Bando Association. David is a direct student of Mahasayaji Dr. Maung Gyi in the American Bando Association and National Bando Association of America. He has over 45 years of experience in martial arts with additional experience as a Sifu of Hsing-I and Ba-Gua under Allen Pittman and Tibetan Lion's Roar under Charles Daniel. For more info on David Daniel, join the Facebook group: The American Bando Association and Friends.
]]>
https://pekiti.com/blogs/news/pti-5-attacks-subsystem-history-and-basic-training2024-11-07T00:33:04-05:002024-11-07T01:22:45-05:00PTI 5 ATTACKS SUBSYSTEM, History and Basic TrainingTuhon Bill McGrathMore]]>
PTI 5 ATTACKS SUBSYSTEM, History and Basic Training, by Tuhon Bill McGrath. .
In the 1980s it was very common for me to be sent by Tuhon Gaje to teach follow up seminars for him. These were at schools that wanted a second seminar with Tuhon Gaje soon after his first one there, but that date with him was already taken. When I went to these seminars, I would usually ask him “What should I teach?” And he would usually reply “Teach them 5 Attacks.” Well, if you have studied the basic 5 Attacks that you see in the 64 Attacks or Doce’ Methdos sets, then you know that it’s not easy to have modern students at a weekend seminar practice just that basic material for the whole weekend.
In my travels teaching, I had noticed that the majority of stick or sword based martial arts had a core, basic set of attacks that had four diagonal attacks and a thrust as their fifth attack. That thrust varied depending on the weapon used, but everyone seemed to follow that same idea, 4 diagonal attacks and a thrust. In the 5 Attacks Subsystem, I decided to use this common idea as a template and incorporate elements of advanced principles from Segidas, Contradas and Recontras onto these 4 diagonals, but changed the 5 into something like an algebraic equation, ie What is 5?, 5 equals any attack that is not a diagonal.
What is the Matrix?
Long before the movie came out, I was experimenting with some combinations seen in the Solo Contradas, and expanded them into a square pattern of numbered attacks. Here is the basic set, with R meaning Reverse (a reverse cut or strike).
R1-2-3-4
R2-1-4-3
R3-4-1-2
R4-3-2-1
Did you notice that the patterns repeat themselves in several directions? When I wrote this on a board in class (around 1990) one of the students said this type of pattern was known in mathematics as a "matrix."
SOLO BASTON 5 ATTACKS SUBSYSTEM. Introduction to Forward & Reverse Strikes.
Here are some videos to help you prepare for upcoming 5 Attacks Subsystem seminars and classes.
Video 1. 5 ATTACKS WARM UP. Angles 1 & 2.
Video 2. 5 ATTACKS WARM UP. Angles 3 & 4.
Video 3. 5 ATTACKS WARM UP. Form.
VIDEO 4. 5 ATTACKS: Sample Applications.
Video 5: Pekiti Tirsia 5 Attacks Subsystem. Mini Lesson: sample.
A sample from the 5 Attacks Subsystem Mini Lesson: Forward and Reverse Strikes, taught by Tuhon Bill McGrath. $12.00 for this 23 minute lesson, (or just $6 when you use the sale code. See note below) which covers detailed instruction in the forward and reverse strikes of the 5 Attacks Subsystem, as well as an easy footwork pattern for solo practice.
Video 6. MATRIX FOOTWORK DRIILS FROM PEKITI TIRSIA INTERNATIONAL
A sample from the Matrix Footwork Drills Mini Lesson from the 5 Attacks Subsystem, with Tuhon Bill McGrath. Normally $12.00 for this 43 minute MP4 video, (or just $6 when you use the sale code. See note below) which covers detailed instruction in 12 integrated footwork patterns for single stick practice. (Includes a 6 minute segment on translating the Matrix drills for empty hand use on a heavy bag).
NOTE: The PTI half off sale on Basic/Beginner videos is going until Nov 15th. Use the code on this page for your discount: https://pekiti.com/collections/beginner-videos
Train Hard, but Train Smart, Tuhon Bill McGrath
For info on upcoming PTI classes, seminars and camps, visit: https://pekiti.com/pages/upcoming-seminars
]]>
https://pekiti.com/blogs/news/bad-iron-palm-alphabito-tapada-crazy-eddie-stories-part-42024-09-27T23:05:51-04:002024-09-29T16:46:19-04:00Bad Iron Palm, Alphabito & Tapada (Crazy Eddie stories part 4)Tuhon Bill McGrathMore]]>
Suryadi “Crazy Eddie” Jafri training in 1980
Here is a story of how bad Iron Palm training led to Tuhon Gaje creating a staff system for his friend Eddie Jafri.
VIDEO: BAD IRON PALM.
VIDEO: HISTORY OF TAPADA (Note, this is not the same as the Tapado system).
VIDEO: TAPADA HIT. Showing the main strike of the Tapada system.
VIDEO: COMPARING ALPHABITO & TAPADA "A" STRIKES.
VIDEO: COMPARING ALPHABITO & TAPADA "B" STRIKES.
VIDEO: MY NOTES FOR ALPHABITO & TAPADA LETTERS A & B
Here is a look at the Lagas Tapado system from Negros Occ. in the Philippines. Master Reynaldo, GM Wilbur "Kikok" Presno, and Instructor Florenico Martin Jr. of Lagas Tapado shows the center line attack/defense.
As you can see, this is a different system than the one Tuhon Gaje made for Eddie Jafri.
]]>
https://pekiti.com/blogs/news/timing-and-your-fighting-style2024-09-03T16:17:55-04:002024-09-03T17:11:45-04:00TIMING AND YOUR FIGHTING STYLETuhon Bill McGrathMore]]>
Four fighting timing styles to help you understand what may work best for you.
VIDEO: SPEED DEMO AND ADVANCED SPEED DRILL
The first ten seconds of this video shows me doing the first set of Pekiti-Tirsia Seguidas at full speed at a 1988 demonstration. The remainder of the video shows the way we were taught the 1st set back in 1980. This is probably the most unimpressive of the three drills shown in my essay on speed training*; but if you want to know how I got so fast in my Seguidas demonstrations, this is the way.
I had an interesting question come in recently about my advanced speed drill video:
Q: “Not trying to be disrespectful with my question; I have no experience in this art: Couldn’t an uneven tempo be harder to defend against? “Quick-quick-slow-quick?”
I replied: “Excellent question. I think it depends on your fighting style. If you are firing like a sniper, one attack here, another there, then an uneven tempo can work. However, if you are firing like a machine gun, then the total rate of fire should be fast. Rounds per minute counts. If the average human reaction time is 1/4 second, then having each different move firing at quarter second intervals or less, will make it difficult for the opponent to anticipate your angles of attack and counter effectively.”
To continue the firearms analogy further; you could divide timing of your attacks into four categories:
1. The Sniper: Separate, accurate attacks from range, using footwork to avoid your opponent's attacks and create openings for your own.
Video: Muhammad Ali's Footwork & Jab - TECHNIQUE BREAKDOWN
2. The Machine gun: Multiple, quick attacks to overwhelm the opponent through numbers and aggression. Video: What Makes Mexican Boxers So Great?
3. The Shotgun. A small number of powerful attacks from close range.
]]>
https://pekiti.com/blogs/news/three-drills-to-increase-your-speed2024-08-11T21:52:25-04:002024-09-03T16:53:09-04:00THREE DRILLS TO INCREASE YOUR SPEEDTuhon Bill McGrathMore]]>
One of the attributes that the original NYC Pekiti-Tirsia group from the 1970s was known for was our speed. Here are some tips to show you how we got so fast.
VIDEO: Some samples of videos that show the kind of speed that was developed through the "old school" Pekiti-Tirsia training methods.
VIDEO: How to measure your training tools, so they will fit you and help your speed training. The first place to start is with the right tools. Here are some tips on choosing a rattan baston, a hardwood sword trainer and a polymer sword trainer that will fit you properly for training in the Pekiti-Tirsia system.
VIDEO: Introduction to the "1,000 Times" concept. When I first started stick training with Tuhon Gaje, it was very common for him to give new students the instruction to do a technique "1,000 times." The idea here was to get your muscles so fatigued that you did not have the energy to add extra movements and you would naturally fall into the most efficient way to do the technique.
VIDEO: A Beginner's Speed Drill based on the 5 Attacks Subsystem. Much of your speed in stick work, especially in combination strikes, will come from the efficiency in the transitions between those strikes. Here is a drill based on the basic four diagonal strikes to help you move more efficiently.
VIDEO: An Intermediate Speed Drill based on Contradas principles. This is a drill to develop speed and power while maintaining control of the training sword through the use of a "double force" grip. In Pekiti-Tirsia, the Double Force grip has your free hand adding power when needed to your sword hand, while still keeping the flexibility of a one handed grip.
VIDEO: An advanced Speed Drill based on Seguidas. This one is probably the most unimpressive of the three drills shown in this essay; but if you want to know how I got so fast in my Seguidas demonstrations, this is the way.
VIDEO: Here is another look at Seguidas that may help you understand the concepts shown in this essay.
Train Hard, but Train Smart,
Tuhon Bill McGrath
PS. This is a companion piece to my essay "How to Hit Hard."
]]>
https://pekiti.com/blogs/news/pekiti-tirsia-espada-y-daga-overview2024-07-27T12:00:23-04:002024-10-28T23:07:28-04:00PEKITI-TIRSIA ESPADA Y DAGA OVERVIEWTuhon Bill McGrath Set 1: The daggers of both you and your opponent are held in Hammer grip.
Set 2: You are switching between Icepick and Hammer grips, while your opponent remains in Hammer grip.
Set 3: Both you and your opponent hold your daggers in Icepick grip.
Each of these three sets has a subset of 12 Attacks, 12 Disarms, 12 Contradas (“Counters”) and 12 Recontras (“Recounters”). This gives us 144 total techniques in Pekiti-Tirsia Espada y Daga.
. Like most of the advanced work in the Pekiti-Tirsia system, Espada y Daga is taught in techniques grouped around core principles specific for that weapon or the fighting style of the practitioner. These are divided into three levels or “sets” with each having a specific grip of the dagger.
Set 1: The daggers of both you and your opponent are held in Hammer grip.
Set 2: You are switching between Icepick and Hammer grips, while your opponent remains in Hammer grip.
Set 3: Both you and your opponent hold your daggers in Icepick grip.
Each of these sets has a subset of 12 Attacks, 12 Disarms, 12 Contradas (“Counters”) and 12 Recontras (“Recounters”). This gives us 144 Espada y Daga techniques in total in the Pekiti-Tirsia system.
Attacks: These are a combination of cuts and thrusts that use the sword and dagger in coordination with each other. An important part of training the attacks is learning to move effectively with two edged weapons of different lengths.
Disarms: These are techniques to remove the sword and the dagger from the opponent’s grip.
Contradas: These are attack combinations based on speed and out-maneuvering the opponent. Contradas techniques are useful when your opponent’s weapons are stronger or heavier than your own. Contradas techniques tend to leave an escape route open, in case the attack is not successful. Most of the techniques in Contradas try to answer the question of "What if?" As in "What if my first disarm is unsuccessful" or "What if my opponent counter attacks in the middle of my disarm attempt?" This is learned first as a technique with specific attacks and counters. Later you will practice a larger drill where you respond to random counters in real time.
Recontras: These are direct and decisive attacks, used when your opponent, or his weapon, is faster than you or your weapon. Attacks in Recontras are simple, strong and fully committed, but require excellent timing to execute successfully.
PEKITI-TIRSIA ESPADA Y DAGA VIDEOS:
ESPADA Y DAGA TOOLS MEASUREMENT: Measuring the sword and knives for sets 1, 2 & 3 of Pekiti-Tirsia Espada y Daga.
Espada y Daga Set 3, Draw 1.
ESPADA Y DAGA SOLO DRILL FOR SET 1: A solo practice drill for the 1st set of Pekiti-Tirsia Espada y Daga. Part one shows a double dagger drill. Part 2 integrates the sword and dagger movements. The focus here, as well as the next two videos, is to practice keeping each arm away from the weapon on the opposite side of your body. The principal here is that your first training with a weapon should be how not to hurt yourself with that weapon during it use.
ESPADA Y DAGA SOLO DRILL SET 2: This Espada y Daga warm up drill is based on the *matrix pattern from the 5 Attacks Subsystem that I teach as an intro to Pekiti-Tirsia Solo Baston. Shown is a 4 X 4 pattern drill using four basic cuts with the sword, interspersed with sample dagger thrusts. You will hear me refer to a “reverse” number at the beginning of each set of four. The idea here is using a point of origin for a strike that is not the usual one practiced. So, if a forehand diagonal download cut is normally delivered chambered on the right shoulder, a number 1 in this set, then a reverse 1 is a forehand diagonal downward strike that comes from a chamber on the left shoulder. Here is the pattern shown in the video: The R at the beginning of each pattern denotes a reverse cut.
R 1, 2, 3, 4. R 2, 1, 4, 3. R 3, 4, 1, 2. R 4, 3, 2, 1.
In the basic version of the drill, you are using only fluid cuts. You can then move on to intermixing any sequence of broken, circular cuts, etc as well as add the knife thrusts at different points. The idea here is to force the student to get a bit of practice in his “non-favorite” angles of attack. To deliberately hit from awkward and unusual angles, because the opponent will often have the “usual” angles well protected. It is also designed to give the student some mental flexibility in what options are open to him. (*A matrix is a math term that predates the movie of that name, and here denotes a rectangular pattern of numbers).
ESPADA Y DAGA SOLO DRILL SET 3: This solo practice drill is based on Upper 8 from Doble” Baston, plus the 5 Attacks Subsystem.
SET 1 DRILL: A two-man timing drill from Set 1, based on the 5 Attacks subsystem. Notice the footwork and positioning used during this drill.
Espada y Daga, Set 1 sample. An Attack, a Disarm, a Contradas and a Recontras from level one Pekiti-Tirsia Espada y Daga.
]]>
https://pekiti.com/blogs/news/how-to-choose-a-large-knife-for-survival-or-general-camping-use2024-07-26T01:11:30-04:002024-07-26T11:34:34-04:00How to choose a large knife for survival or general camping use.Tuhon Bill McGrath If you do choose the One Tool Option, you will be in good company. Most indigenous peoples around the world carry just one blade and it is usually a big one, like a machete, bolo, parang, kukuri, etc. The men of these groups would traditionally go off on multi-day hunting trips with only one large knife. Remember, it's not the only thing they have to carry and weight carried equals calories used; so there is going to be a tradeoff between tools carried and ease of travel.
An axe or machete, a small woodworking knife and a folding saw would serve you better if you have the room in your pack, but if you want to carry just one tool, a well balanced camp or bowie knife is a good option in many areas of the U.S.
If you do choose the One Tool Option, you will be in good company. Most indigenous peoples around the world carry just one blade and it is usually a big one, like a machete, bolo, parang, kukuri, etc. The men of these groups would traditionally go off on multi-day hunting trips with only one large knife. Remember, it's not the only thing they have to carry and weight carried equals calories used; so there is going to be a tradeoff between tools carried and ease of travel.
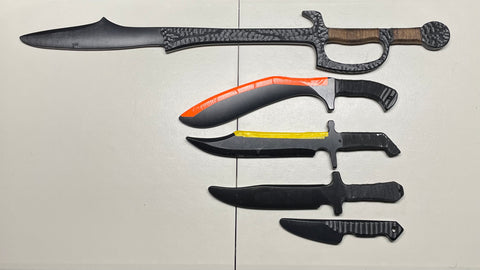
Bottom row by column , Lt to right. Cold Steel Trailmaster and Recon Scout, Kukri blade blank from Camilus, Cold Steel Barong machete, Becker BK2, Browning Crowell/Barker Competition knife. Blackjack Rio Grande Camp Knife (Dis), Blackjack Kampa (Dis), Ontario Heavy Machete
Note: Cold Steel had fixed the problem with the sharp shoulders on the tang/blade juncture by the time I made this video in 2010, but I was not sure how long it would take for the problem knives to work their way through the sales chain (I think many ended up as "factory seconds"). This made me very suspicious of the larger fixed blades from Cold Steel for several years and I ended up selling the two CS bowies you see in the video.
TRANSCRIPT: Hi Guys, Tuhon Bill McGrath here. I wanted to talk to you a bit about how to choose a large knife for outdoor camping and you know emergency survival use.
As you can see I own a fairly decent number of outdoor knives and gone through different models and manufacturers from the time I was a teenager and the Boy Scouts up till now.
You know, your your tendency as a American male is try to get one tool that does everything because that's the, you know. the ultimate in coolness. But really it's hard to do that. The classic outdoor survival combination was really an axe or a hatchet and in the old days, a small knife and you know, a skinning knife or whatnot and a small pocket knife. In modern Bushcraft, camping use they’ll include a folding saw on that (list). I generally carried a bunch of different folding saws small hatchets and sheath knives.
A machete is a useful tool, not only if you're in the jungle but if you're looking to make a camp mattress; getting some, cutting some cane, or Cattails, or whatnot, to make a mat or camping mattress or to thatch a roof in a survival situation. A lot of the Indian tribes where I live would make a wigwam out of Cattail rushes woven together in kind of a half circle beehive type shape and so that's a good tool to have even if you're not in the uh in the jungles cutting vines. But anyway what I want to talk to you about is the knives I finally come down to if you have to use one big knife. An axe is, you know, definitely a better wood cutter, you know.
When I was in the Boy Scouts you know small hatchet like that little hardware store model was our common hatchet and I've gone up through the years, you find that, you know, when you get up to a two-handed axe and this is a nice small two-handed axe from Cold Steel there that I actually like. It’s inexpensive 25 bucks and it does the job pretty well. You have a good amount of leverage there. You have a heavy head, compared to say that Wetterlings there, which is an 18inch handle it’s about as small as I can get two hands on. But the larger one you can really do some good wood cutting with that. But that's not something going to fit inside a day pack too easily. It's going to have to be strapped to the outside; they get some weird looks from people on the trail. So there is a use for a bowie knife as an all-around tool that you have on you if you're out there day-hiking or whatnot. You might have this in your pack when you're on the trail or put it on your hip when you're at camp.
Now how to choose a bowie knife or a camp knife? The the ones I have here are two Cold Steel models, You’ll see a Trail Master and the Recon Scout. And then the two Camp knives are from the now defunct Blackjack knives, a Moran and a Kampa and I like the idea of this size knife.
It's versatile if you just want something on your hip if you don't want to carry a big backpack around. For many years the Cold Steels are my favorite, but I ran into problems. The Cold Steel tang is cut with a water jet cutter from a different company and they'll go in and put the handles on it (Cold Steel) and it's a very sharp corner very much like this kukri blade blank you see here. So you see that corner there it’s very easy to get a stress fracture in there and especially in cold weather, or if that angle is very sharp I've had cases where I've broken the Cold Steel Recon Scout there, and I’ve heard of other people doing it with the Trail Master there, right at that juncture where the guard meets the tang. You know, batoning is a a common cause of that stress fracture, batoning through wood.
The two black jack knives are a full tang as you can see here, going all the way through. so they don't have that sharp demarcation right where the tang meets the blade. That company's out of business so you can't go with those. (I was wrong here. They are now Bark River Knives)
So I found something recently that kind of meets the bill. This is a Browning Barker. It’s a good quarter inch stock and you notice it has a a tapered tang and what I like in that type of configuration and you see the handle is also tapered is it gives you good a good amount of length so you can do cutting chores like you could with with a short machete cutting vines or cattails or brush like that has good reach but it's not so heavy and clunky you know this Camp knife from Blackjack with that full stock almost to the edge; doesn't start to taper until here. It's a good chopper for wood, but if you're trying to cut through light vines, you want a velocity, you don't want weight. So that can get a bit heavy, so a tapered tang like on this Barker here from Browning gives you a nice balance. You have nice reach like you would on a machete, a short machete, but your hand doesn't get fatigued from cutting through something light and not having that stopper impacting the wood. The stock at the base here is quite thick, the same as my K-Bar BK2 here which is a an excellent, uh, basically a wedge with a handle on it for uh for splitting wood. And you could very easily get away with these two knives, the machete and the BK2 and do a lot of work with those.
Or in my opinion you could get a camp knife with a tapered tang, thick stock in the back, you know, tapering right down to a point. You have nice balance because of that the heaviest part of the blade stock is close to your hand, but you still have good reach. You don't have that fatigue cutting lightweight objects. You need velocity as you would with, you know, a say a Rio Grande Camp Knife. So consider something like this when you look for a camp knife: tappered tang and Blade.
You notice there's no cross guard here. I'm not that big on Cross guards. (see note below) Now God-forbid, you would have ti get into a fight with one of these that little bit of a cross guard is not going to really save you. It's not a uh a D guard or even a Bell guard, like you would on a full-size sword. So I'd be more worried about balance and ease of use, rather than having a guard on it. I like Micarter handle slabs the if you're going to use these Kraton handled blades from Cold Steel make sure you wear some gloves or you going to really abrade your hand after a bit of work. They are comfortable though. They absorb shock but you wouldn't want to wear a leather glove.
So if you do end up with just one blade on your person think about something with that distal taper, thick going down to thin in the blade and thick going down to thin in the handle and I think you'll find this to be a a nicely balanced type of blade.
Browning discontinued their Barker models at the end of 2009. You can still find a few of them on the net. I think they go for around 100 bucks, but if not, a lot of custom makers will do that type of work for you.
All right. thank you take care.
Train Hard, but Train Smart,
Tuhon Bill McGrath
A note on guards. At the time I made this video (2010), my pet peeve with many knife companies was the small cross guards had on their knives. I thought it was better to know you had no guard than rely on a guard that was too small to protect your hand from an opponent’s weapon, (especially on a camping knife, where it could interfere with with camp chores). I should have said I single quillon guard (as on the Blackjack Skinner) is better than a cross guard on a camping knife; since the single quillon guard can protect your hand from sliding up the blade, while still allowing for all your normal camp chores.
PHOTOS:
Blackjack Skinner and Cold Steel Drop Fored Survivalist. (Notice how I have ground down the top quillon on the Cold Steel knife to allow the thumb to put pressure on the spine when wood carving.)
Cold Steel Barong Machete and Ka-Bar BK2. I still want a mechanical stop on a knife to keep your hand from sliding onto the blade. A less expensive way to do this on a camping tool than a separate cross guard, is to build the stop into the shape of the handle.
]]>
https://pekiti.com/blogs/news/if-you-must-have-a-leash-at-least-have-it-be-your-own2024-07-16T16:10:17-04:002024-07-16T16:18:50-04:00IF YOU MUST HAVE A LEASH, AT LEAST HAVE IT BE YOUR OWN…Jack Latorre
To make a long story short, the guest didn't want their pic posted on FB for fear of being seen by their regular instructor…and then consequently being excommunicated for training with another instructor (me).
I am told that this is a common practice in the school they belong to. I happen to know this is unfortunately a common practice among various martial art schools, not just FMA instructors.
IF YOU MUST HAVE A LEASH, AT LEAST HAVE IT BE YOUR OWN… By Tuhon Jack Latorre.
. So yesterday I taught another Pekiti-Tirsia class and had a visiting guest take class. To make a long story short, the guest didn't want their pic posted on FB for fear of being seen by their regular instructor…and then consequently being excommunicated for training with another instructor (me). I am told that this is a common practice in the school they belong to. I happen to know this is unfortunately a common practice among various martial art schools, not just FMA instructors. To be clear, I have never told another student (adult or otherwise) to not study elsewhere with other instructors of other arts. As a matter of fact, I encourage my students to take advantage of opportunities to train with other teachers of other martial systems. It'll give them a better idea of what's out there…and what they have (and don't have). You don't know what you don't know. I do not want to retain students because I restricted them and made myself their only choice. I want to retain students because they enjoy the instruction. If they enjoy the instruction of another person more, then there are no strings attached with me. They can and should go elsewhere. But they never are pressured by me to stay with me…ever. I don't really blame the visiting student much. They don't want to burn a bridge with someone they built a relationship with. They just need to remember that they themselves are sovereign individuals…and should make their own choices as they see fit. Threats of excommunication really isn't the adult way to go about doing things. That's a red flag in my opinion. I sort of understand the instructor, as they want to retain students. It might be how they put food on the table for their families. I get it. I get ego is a powerful force to contend with. However… Telling students not to train with another instructor or they'll be kicked out is insecurity at the very least. At its worst, it's a cult-like atmosphere in which control is the objective…and not the well being of the student. Adult students can figure out for themselves which instructors have their best interests in mind. Naturally, I have my own opinions about which instructors are quality teachers (and which aren't)...but I let individuals figure out what's best for them. If a student wants my opinion, I'll give them my opinion. I just tell them that they should go and find out for themselves…that they can form their own perspectives of what they experience. It'll be more meaningful that way. Some of you may note that I willingly share the events of other instructors and organizations. That's not by accident. You don't improve the constitution of FMA by being isolated self-righteous zealots. Rather, the health of FMA will largely be based on educating your constituents and allowing them to experience the breadth and depth on what FMA has to offer…and training them earnestly. If what you have is worthy to them, they will come back. If they don't, it might be for various reasons…but it should give you some feedback as to what you might need to adjust in your practices and in your mindset. I hope this finds all of you well…and that you find the right training for you while never being limited by the insecurities of another individual.
Best, Jack A. Latorre Tuhon Executive Director Pekiti-Tirsia International www.ptiacademy.com
]]>
https://pekiti.com/blogs/news/2025-help-me-celebrate-my-50th-anniversary-year-in-the-pekiti-tirsia-system2024-06-29T13:53:26-04:002024-11-06T15:44:24-05:002025. Help me celebrate my 50th Anniversary year in the Pekiti-Tirsia system.Tuhon Bill McGrath
Here are some ideas I have to celebrate these events.
I started training in the Pekiti-Tirsia system in February of 1975 and therefore, February of 2025 begins my 50th year in the system. In addition, I started PTI in July of 1995, so next July will be my 30th anniversary as President of PTI.
(Lt to Rt.) Phil Gelinas, Dan Inosanto, Bill McGrath and Omar Hakim at a 1996 PTI instructors meeting. This photo was taken in my backyard, where we worked out during the day and then had our meeting at my dinner table later that night. (More old photos at the bottom of this page.)
Here are some ideas I have to celebrate my two anniversaries.
WINTER PTI INSTRUCTOR’S CAMP: February 22 and 23. Orlando, FL.
I would like to start things off with a Winter camp for PTI Guros and Certified Trainers in Florida in February. The Orlando area makes sense, as most airlines have direct flights there from their major hub airports, hotels are plentiful and it’s much nicer there in February than where I live in New York :-). Of course a big bonus is that you can bring your family and enjoy the parks when not at PTI camp.
Note: My planed curriculum for the Winter Instructor's Camp is to show my current teaching format for Empty Hand vs Knife & Knife vs Knife, which integrates both curricula into one teachable unit. (See the last section of this essay for more on this).
I have already made plans with the PTI Director for Italy, Andrea Citarelli, to start my European seminar tour with the first two weeks of May in Italy. The first weekend will be exclusively for PTI members and the following weekend will be an open seminar. I would like to visit each country that I have ever held seminars in Europe during this tour and have days set aside just for testing of PTI members and then an open seminar.
4. NEW YORKSUMMER CAMP: Fishkill, NY.
I’ve already spoken with Tuhon Jack and the other PTI senior instructors and we would like to hold the 2025 Summer camp for 4 days in early August. The general format will be a comparison between how I was originally taught the system and any newer teaching methods that I or other PTI instructors have developed over the years.
ATTN: PTI members, please send me your preference for which days work best for you for this camp: Fri-Sat-Sun-Mon, or Thursday through Sunday, or Saturday through Tuesday. The Friday through Monday format would mean the lowest airfare (tickets on Tues, Weds, or Thurs are usually cheaper than on a Fri, Sat, Sun or Mon). However, many people would have an easier time getting off from work if all the days requested are in the same week (this usually means those leaving on a Sunday will miss half the day of the seminar if flying back home). The airport closest to Fishkill, NY is in Newburgh, NY (airport code SWF). Newburgh is about 30 minutes from the park where we will hold the camp, but the flights into this airport are limited. The next closest airports are in in Albany, NY. (airport code ALB), in New York City, which are Laguardia (LGA) and JFK and in Newark, NJ (airport code EWR).
Here are some preliminary ideas on the curriculum, but I would really like to hear from PTI members on specifics of what you would like to see at this camp:
DAY 1 Solo Baston/Solo Sword.
The first techniques I learned were the Multiple Attacks and the first set of the Solo Abacedario. We will show samples of all associated drills with the Abcedario as well as the sword variations.
In the 1980s it was very common for me to be sent by Tuhon Gaje to teach follow up seminars for him. These were at schools who wanted a second seminar with Tuhon Gaje soon after his first one there, but that date with him was already taken. When I went to these seminars, I would always ask him “What should I teach?” And he would always reply “Teach them 5 Attacks.” Well, if you have studied the basic 5 Attacks that you see in the 64 Attacks or Doce’ Methdos sets, then you know that it’s not easy to have modern students at a weekend seminar practice just that basic material for the whole weekend. Therefore, when I started teaching on my own in the 1990s, I began to incorporate elements of advanced principles from Segidas, Contradas and Recontras onto the template of the basic 5 Attacks and thus, the 5 Attacks Subsystem was born.
Once this section is shown at the 2025 summer camp, I would like to teach the first technique from each solo bastion set in the system and show the sword application of the same material.
What is Segidas? (In the Pekiti-Tirsia system).
PEKITI TIRSIA SEGUIDAS: STICK VS SWORD TECHNIQUES.
PEKITI-TIRSIA STICK DISARMING ANGLES IN MILAN, ITALY.
DAY 2: Doble’ and Empty Hand.
AM SESSION: The basic Doble’ 12 Attacks I learned was intended to teach gross motor skills to the upper body. It was not until we were taught the Contradas and Recontras that usable combat footwork was taught. Over the last ten years I have tried to incorporate this footwork from the beginning of basic 12 Attacks. Therefore, we will begin this session with a review of Upper 8 with variations of more advanced footwork. The rest of the morning session will be spent on Doble’ Contras and Recontras. (Note: That's a very young Doug Marcaida helping me show some Doble' material).
PM SESSION: KICKBOXING: the new material is just what was changed after the blood born pathogens hit the scene in the 1980s. Most of this session will be spent on the Abcedario de Mano and the Pekiti de Mano. We will use these two sets to work the 3 person team “decision tree” drills. Since we have so many instructors who also train in kickboxing specific arts, such as Thai boxing, I would like to see what drills they will show to improve PTI kickboxing.
DAY 3: Espada y Daga.
Measuring the sword and knives for sets 1, 2 & 3 of Pekiti-Tirsia Espada y Daga.
I have some new warm up drills that I will teach at the camp will should help introduce students to the concepts of Espada y Daga. Samples from all three sets will be taught.
DAY 4: Solo & Doble’ Daga.
AM SESSION: Hand vs Knife and Solo Daga.
PM SESSION: Doble’ Daga. The first half class will take what was taught in the AM session and apply it to Doble Daga to reinforce both the general principles as well as the gross and fine motor skills of the techniques. The second half will give a sampling of the full Doble’ Daga material.
HAND VS KNIFE OVERVIEW:
For the last few years, I have been bringing elements from advanced hand vs knife into basic hand vs knife training. This started in my law enforcement officer (LEO) classes for these reasons:
1. We were never given the same amount of time to practice the material as you would have in a traditional martial arts class or seminar.
2. There was a possibility that some of the LEOs present would need to use what was taught them in the near future.
Since I barely had enough time to teach a few principles and little time to teach many actual techniques, I grouped the few techniques I did teach onto a framework of core principles. It made for faster learning and the LEOs did seem to have good retention of the material whenever I saw them again.
“OLD” VS “NEW”
When Grandmaster Leo Gaje began training us in Pekiti-Tirsia hand vs knife technique, he followed a very specific structure that I often liken to the manufacturing of a modern automobile; as in several sub-assemblies are built and tested before these sub-assemblies are brought together to form a complete whole. Each level of empty hand vs knife was divided into three sections: each taught, practiced and tested before assembly into a whole unit. These three sections are:
1. Parrying skills: This is the classic “knife tapping” drill of primary, secondary and tertiary parries. The purpose of this drill is twofold:
A: To learn to deflect the force of a knife attack instead of trying to stop it with a block: since blocking is a difficult thing to do against something as fast and as maneuverable as a knife attack.
B: As an exercise specifically designed to improve your hand-eye coordination, speed and reaction time.
2. Striking skills: These are the “Third Hand” strikes of Pekiti-Tirsia. These are comprised of slaps, eye jabs and gouges, forearm hacks, hammer fists, elbow strikes and low kicks.
Both you and your opponent can strike each other in the middle of a knife fight. While you have to fit these into a countermove for each knife attack angle, so you don’t get cut or stabbed, the guy with the knife does not have to worry about this and so can strike at any time.
History of how I learned Hand vs Knife 1 and Hand vs Knife 2.
Hand vs Knife Level 1 trained these three subjects (parries, strikes & grappling) against an attacker using just 3 specific hammer grip thrusts; the 5 uppercut, the 8 backhand and the 9 wide hook (numbers taken from the basic Abcedario).
Hand vs Knife Level 2 focused its training on 4 icepick grip thrusts (Diagonal 1 & 2, a vertical and a jab) and hammer grip diagonal slashes (as the later shares the same gross motions as the first two thrusts of ice pick grip), plus a high, straight thrust that looked like a boxer’s cross and which Leo called the “in between” thrust, since it was in between the 5, 8 and 9.
(NOTE: the “Knife Abcedarios” for Sak-Sak and Pakal were just my cherry picking bits and pieces of the advanced material and putting these into a familiar form of a 12 count Abcedario. When we first did hand vs knife material Leo stuck to 3 or 4 attacks per grip.)
There was a few years separation between our learning hand vs knife levels 1 and 2 however, as we learned Solo Knife levels 1 and 2 and did a good amount of full contact, armored knife sparring (with wooden knife trainers), before moving on to hand vs knife 2 and solo knife level 3. If I remember correctly, advanced hand vs knife and solo knife 3 were taught either together or very close in time, as the gross motions are very similar.
THE “NEW” TEACHING ORDER:
I should start by saying that I still teach all the material I learned from Tuhon Gaje, I simply teach it in a different order, which I feel serves the needs of the adult students I train today better than the needs I had as a teenager in the 1970s.
When Tuhon Gaje began training us in Pekiti-Tirsia hand vs knife technique, he followed a very specific structure that I often compare to the manufacturing of a modern automobile; as in several sub-assemblies are built and tested before these sub-assemblies are brought together to form a complete whole. Problems occur though, when people spend too much time in the room used to build the car’s frame or transmission and never get to drive the finished product.
Remember the story of Pavlov’s dogs? Ivan Pavlov was a Russian neurologist and physiologist who was doing experiments on the digestive systems of dogs. When he saw that the dogs began to salivate when his lab assistant went into the dog’s area with food, he realized that the dogs had begun to associate the assistant’s white lab coat with their feeding time. And thus Pavlov discovered Classical Conditioning; {a behavioral procedure in which a biologically potent stimulus (e.g. food,, a potential rival) is paired with a neutral stimulus (e.g. the sound of a bell ringing). The term classical conditioning refers to the process of an automatic, conditioned response that is paired with a specific stimulus.}
There was a later story of Pavlov’s dogs losing their conditioning. The story was that a fire occurred in his laboratory which kills some of the dogs and the surviving dogs lost all their conditioning and had to be retrained.
PTK Knife Conditioning: The classic way to teach PTK hand vs knife was to start with Corto range and work outward. This began with knife tapping and Leo’s first attack was usually a 5 thrust to the lower abdominal area to begin this drill. I believe this was because the low line thrust was the most common first knife attack in the Philippines, so it was wise to learn to defend against this first.
There were pros and cons to this approach though. On the pro side it helped develop quick reaction time if you were surprised by a sudden attack. On the con side, it trained you to wait until the attacker got within stabbing range before you began your defense.
I use these two examples (Pavlov and early PTK training) because I often see some PT students staying in the “Training Wheels” phase of the knife tapping drill for too long. Why don’t the “Old School” Pekiti guys have this problem? Two things. One reason was we did not stay in the basic knife tapping format for very long and the second reason was sparring.
Full contact sparring was our “Pavlov’s Lab Fire” which made us switch on the adrenaline and put us in condition red as soon as we put on our armor. This moved the distance outward at which we would be on alert in daily life as well, as you knew when an individual entered the zone where they could hit or cut you.
However, there are two problems I see with sparring that many people have today. On one extreme is that some people get into sparring too early, before they have the skill-set needed to enter quickly from a distance and transition from Largo to Medio and Corto ranges without taking what would be fatal injuries in a real fight with edged weapons.
On the other extreme are those who never spar full contact at all. There are understandable reasons for this, mostly due to the differences between learning Pekiti in the early days, (young, single guys with no responsibilities, verses adults having to go to work to support a family).
Today’s litigious society also puts a damper on your risk taking activities as a martial arts instructor. I haven’t been able to find an insurance company that will cover full contact weapons sparring in New York for many years. (Sparring is still important, but most of the sparring done by PT students these days are in venues outside of New York, often outside the US and under someone else’s insurance.)
My teaching of classes for law enforcement has given me some ways to work around these issues to a certain degree. There are generally two types of law enforcement classes I have taught: 1. Academy classes with new recruits (Mostly people in their 20s). 2. “In service” classes. (These are refresher courses for experienced officers that were usually held once a year).
Since administrators take a dim view of officer training injuries that put an employee out of commission for any length of time, we had to walk a fine line between realistic training and training that allowed them to go back to work the next day. Older officers in our in-service classes were especially prone to injuries if pushed too hard in training. Therefore, here are two principles that helped us teach these LEO classes and still get good reports from officers who had used our training.
1. I’VE BEEN DOWN THIS ROAD BEFORE: It has been shown that officers who have been in a dangerous situation even once, have a significantly better reaction time in subsequent similar situations than do officers who have never been exposed to that situation before.
2. FIRST IN-FIRST OUT: The first techniques you teach are the ones most likely to come out first when under stress. Therefore, teach the things you want them to do first, first.
Here is how I structured my LEO hand vs knife classes. 1. Begin with bag work, teaching the body mechanics of hard strikes with a variety of personal weapons. Give some principles of how to choose what works best for an individual’s body type vs the opponent’s. 2. Calibrate the time it takes them to draw each of their weapons from their duty holsters. Next see how much distance can they cover in that draw time. This will help them decide how soon to go for their firearm or other weapon/tool when under attack. If the attacker is inside their draw-time distance, then their empty hand techniques are needed to buy them time to draw effectively. 3. Teach Pekiti-Tirsia hand vs knife techniques, but string them in a chain of logically needed material, which in my classes equaled: Evade. Strike. Control. Draw. Command.
Evade. This is through footwork at range and a combination of footwork and arm blocks (AKA parries) when in contact range. Your job is to get off the X (the ambush point or the area between his arms, where he can hit you with either hand). Strike. You choose from your toolbox strikes that will work for you on this opponent. Control. These techniques control either the distance between you and the opponent or his weapon arm. These can include pushes, locks, weapon reversals, disarms and takedowns. Draw. This can include drawing your handcuffs, if a control technique is fully successful, or drawing your weapon(s), if you remain in danger from the opponent’s weapon. Commands. Interspersed before, during and after each of these categories were loud, verbal commands, which tell the offender what you want him to do and get the attention of partners and witnesses.
THE “NEW” HAND VS KNIFE FORMAT:
The first thing I teach are common attacks based on western boxing, as it’s important that students train against realistic, common attacks.
These are shown in the two videos below:
Nomenclature for hammer grip: 1. Grab. (The grab here takes the place of the jab in boxing) 2. Cross. (A straight 9 in PT Abcedario terms) 3. Hook. (A wide 9 in PT Abcedario) 4. Uppercut or body punch. ( A 5 thrust in PT Abcedario) 5. Backfist. (An 8 in PT Abcedario)
Nomenclature for icepick grip: (Note: in the bare knuckle Western boxing of the early 1900s, hammer fist strikes were allowed and often called the “Bolo Punch” because the gross motions resembled a man cutting with a bolo sword. This was around the time when the US took control of the Philippines from Spain after the Spanish-American War).
When Tuhon Gaje first introduced us to solo knife to knife material, he had us spend a lot of time, with many repetitions and variations with the jab. He had such an emphasis on this that when we began full contact sparring, I began to think of that as “the largo war of stabs and jabs.” It seemed that only after we scored with a hard stab or jab that stunned our sparring partner, could we do any of the earlier material we had learned in the Corto and Medio drills.
INTEGRATED HAND VS KNIFE:
Here are three principles I use when teaching the full Integrated Hand vs Knife course to Pekiti-Tirsia students:
1. Begin with Largo range and work in from there. 2. Integrate the lessons learned from knife sparring into hand vs knife as early as possible. 3. Have students practice in a realistic chain of events, rather than stay in the “training wheels phase” too long.
1. Since the Grab & Stab is the most common knife attack, I begin with defenses against the first part, the grab. This starts with the attackers approach, so the defender is trained to go on alert as early as possible and look to move to positions of advantage and form a plan to counter the attack.
2. One big take away from our full contact sparring in knife to knife work was how much the principles we were taught and the skills developed there helped our empty hand vs knife work. This meant having the timing to attack the opponent’s weapon hand and thinking like a knife fighter, even when empty handed. This specifically means attacking the opponent’s weapon arm with the same gross motions as you would if you had a knife, but converted to effective empty hand strikes.
3. The goal here is to buy you time to do bigger, better strikes to take him out or take him down or create distance to draw your weapon or get to a weapon of opportunity.
The diagram below is based on Pekiti-Tirsia Ranging Footwork and lays out the footwork and sequence used against the grab of the Grab and Stab attack. This is a “Decision Tree” diagram, with the red rectangle with the circle in it representing your opponent standing in a left lead stance. The red arrow is his left arm reaching out to grab you. The items in green represent your choices of directions during the fight.
The video below shows the right side of the diagram in action, with you starting from a left lead.
After the Grab counters are practiced from both right and left leads and both right and left escape routes (and all combinations there-of); we then go onto two step attacks, wherein the opponent attacks with a 1&2 (grab attempt and cross), then a 1&3, a 1&4, etc.
I have them practice all the classic PTK knife parries, but I start with all the primary parries in a chain combined with a strike, a distancing or grappling technique, then a draw or move to an escape route.
Once they have a sample chain to practice for all the common attacks, we can then work on classic material such as the secondary and tertiary parries and lock flow drills. I feel this puts the students on a faster path to usable skills than staying in each section of the classic drills until it is perfected, before moving on to the next drill.
My goal for the Winter Instructor’s Camp in 2025 is to polish off the rough spots in this teaching method, so we can present it to the general body of PTI members at the Summer camp that year.
A NOTE ON PTI RANKING: When Tuhon Gaje first learned the system, he was taught in the order of isolated footwork first, then all the solo stick/sword material “A through Z”, before moving on to Doble’; also training A through Z , before moving on to Espada y Daga, and then Daga, with empty hand material coming last. All this occurred over a period of 12 years (with the first three spent on isolated footwork drills. For more on this, see my post “MODERN TRAINING TIME: HOW FAST VS HOW MUCH https://pekiti.com/blogs/news/modern-training-time-how-fast-vs-how-much ).
What you see in the PTI Rank Chart is my own journey through the system and my memory of what material I had when I was promoted to each rank. The original Blue Book I made for PTI in 1995 reflected much of that order (one exception was Leo instructing me to move Pekiti Disarma from the end of Solo Stick/Sword to a spot between 64 Attacks and Seguidas, to act as a buffer between the basic and advanced material in the system. “If they can get through the Disarma, only then will they deserve Seguidas” was how he explained it to me.)
The first Blue Book reflected when I received certain techniques and that explains why you saw anomalies such as Espada y Daga level 2 Attacks and Disarms in one rank (which was in Test Book 1) and the EYD level 2 Contradas and Recontras in the rank above it (which was in Test Book 2). I tried to rectify these anomalies when I made the current, combined test book, putting all of EYD 2 in one rank.
The differences between the original PTI Test Book (copyrighted in 1995) and the new version (copyrighted in 2014) may be one of the topics we can discuss at the 2025 instructor’s camp.
DOWN MEMORY LANE:
(Clockwise from upper Lt): Photos from 1977. This is me and one of the Sayoc brothers at the World Trade Center during a Philippine Independence Day demo.
Larry (last name?), Jim Curtane and Tom Bisio at the Pekiti-Tirsia tournament held on the rooftop handball court of the Philippine Consulate in NYC.
Me testing on the 64 Attacks during the forms competition at the 77 tournament.
Me trying to look cool at the WTC.
(top) 1976. Me and my best friend Mike Maddi doing Bruce Lee imitations.
(bottom) When I was a teenager, this was the coolest car in the world. Leo's 1973 Dodge Charger Superbee edition with the 383 Magnum engine.
I think this was taken in 1976 or 77. Me and my buddy Mike again. When I said a was a very skinny teenager with very big hair, I wasn't kidding. Mike went on to become the special effects makeup guy on the TV show "Gotham." I remember hanging out at his parents house, watching him build armatures for movable models of Ray Harryhausen style movie monsters. Good times.
You will find more old photos of my young and skinny former self from martial arts magazines in this section:
]]>
https://pekiti.com/blogs/news/tuhon-jared-wihongi2024-05-10T23:59:58-04:002024-06-14T11:43:58-04:00Tuhon Jared WihongiTuhon Bill McGrath The instructor I chose to represent the newer methods was Jared Wihongi, based on several factors. He was a fellow law enforcement officer, a good family man and had a reputation for integrity and self disciple.
In 2019 I began planning a series of joint seminars I intended to start in 2020. The first was going to be a seminar focusing on the Pekiti-Tirsia system, with a look at the “classic” way I had learned the system in the 1970s and 80s, compared with the new methodologies being taught in the 90s and 2000s.
The instructor I chose to represent the newer methods was Jared Wihongi, based on several factors. He was a fellow law enforcement officer, a good family man and had a reputation for integrity and self disciple.
On the technical front, I saw him bring Pekiti-Tirsia material and streamline the training down to core principles that a class of police officers could reasonably be able to learn in the short time given them by most agencies these days.
What really stuck in my mind though was that he was one of the few instructors of the “modern method” that understood the place footwork has in the Pekiti-Tirsia system, using it in the right way, at the right time, for the right purposes.
Well, you can guess what happened to my plan for 2020. However, I was finally able to hold two joint seminars with Jared post pandemic. One in October of 2021 in Las Vegas and the other in June of 2022 in Atlanta (the later, along with Ray Dionaldo). In each case, I found Jared to be an excellent teacher, with students and associate instructors who reflected his skill and professionalism, as well as honest in his business dealings with me. I have also done interviews with Jared on the FMA Discussion and Aperture Fight Focus talk shows. (See links below).
Back in April, I received the following email from a mutual student of ours in Europe:
“I’m not gonna dive deep into politics, but I’m sure you heard about Jared getting promoted to Grand Tuhon. Of course I can’t speak for him, but for me as a Pekiti Practitioner: I would love it, if Jared as the new GT could bring together former “repelled” Organizations and reconcile former practitioners of the art. Everyone hates the old politics and arguments. And everyone should love our beautiful art together.”
I immediately forwarded the email to Jared and suggested that we should work together on this issue when we saw each other at another joint seminar we had planned for the beginning of May. (We had to postpone that seminar due to events at the location, but hope to reschedule for a later date).
Recently there was some controversy* coming out of the Philippines that made work on this project difficult at this time; but I have seen such controversies come and go in the 49 years I have been in the Pekiti-Tirsia system and the 29 years since I started PTI.
I still feel Jared is the right person from the modern PTK instructors to help me bring together the various people who trained with Grand Tuhon Gaje over the years and try to bring some healing and comradely to the group.
My feeling is that most people dislike the politics of the current situation and just want to train in the art they love. Next year will be my 50th anniversary in the Pekiti-Tirsia system. I would like to put all politics aside and hold as many joint seminars as possible with all Pekiti-Tirsia groups, no matter their affiliations. Small seminars, large seminars, on line or in person, it does not matter: let’s just get together, have fun and make each other better at the art we love.
Regards, Tuhon Bill McGrath
*Note: Here is what the controversy was about. After Jared was notified of Grand Tuhon Leo Gaje's intent to promote him to Grand Tuhon, Jared anticipated some blowback from other groups and discussed with Grand Tuhon the importance of protecting the PTK logo in the Philippines from outside influences. Steps were taken to do just that. After the trademark application was discovered by other groups, people jumped to conclusions and online attacks on Jared were made.
Update and details on the issue from Paulo Rubio:
Sample from interview with Tuhon Bill McGrath and Tuhon Jared Wihongi. Sept 2021. 3:32 minutes.
Full Interview with Tuhon Bill McGrath & Tuhon Jared Wihongi. Sept 2021. 90 minutes.
FMA Discussion Episode 202 - PTK Then and Now with Tuhon''s Bill , Jared and Philip. Sept 2021. 2 hours.
]]>
https://pekiti.com/blogs/news/the-64-attacks-of-the-pekiti-tirsia-system2024-03-09T00:48:08-05:002024-06-23T14:26:06-04:00THE 64 ATTACKS OF THE PEKITI-TIRSIA SYSTEMTuhon Bill McGrathMore]]>
The 64 Attacks is a set that combines the first three years of basic training and timing drills Tuhon Gaje was teaching in the 1970s into one group of techniques and principles. This was done mainly to give us a form that we could be tested on and compete in the forms completion at our next tournament.
Here is the form, as I learned it in the 70s. I used to test students on both the form and the application drills, but these days I only require testing in the timing drills and applications (as these are the most important parts). However, I leave it up to the other PTI instructors to include the forms in their testing, if they wish.
Here is the numbering in the 64 Attacks form as I learned it in the 1970s.
#1 TO 12: First set of Abcedario. #13 TO 22: Four Wall “Apat na Paligid” basic entry technique against strikes in a simple timing drill. #23 to 25 Umbrella “Payong” fluid entry techniques. #26 TO 31 Tapping against thrusts “Pangising” (a drill of 3 attacks, 3 counters, and 3 recounters but #26 to #31 in the condensed 64 Attacks) Taught with “Chekete” (direct) and “Echekete” (indirect) counter to weapon-arm pinning drills, counters and recounters. The whole platform is often called the Dakup y Punyo drill. #32 TO 36: Five Attacks “Limang Sugod” diagonal attacks, entries, and counter-to- counter drills. #37 TO 43: Break in-Break out “Pasok Lo’ob – Pasok Labas” linear attack, entry, and counter-to-counter drills. Taught with “Segang Labo”, a close-quarter engagement-disengagement drill that acts as a platform for close-quarter disarms, traps and takedowns. #44 TO 50: Seven Attacks “Pitong Sugod” Entry, off balancing, takedown or repelling techniques. #51 TO 64: Clock System “Orassan." Entries and baits with double force. Introduction to flat-of-the-blade strikes (called in Visayan “Witik” -lit. to flip or whip, but used here “to cheat”; called “Abaniko” in several other dialects).
Solo Baston Multiple Attacks. I was taught this set as a warm up for the Abcedario. If the Abcedario is the alphabet, then you can think of the Multiple Attacks as the vowel sounds.
Details on the 64 Attacks:
#1 TO 12: First set of Abcedario.
Grand Tuhon Gaje told us that he spent one full year as a child learning the Solo Baston Abcedario, learning one set of 12 attacks at a time, building up until he had all 144 techniques in the 12 sets. Let's say he started in January with the first set: 12 strikes learned and practiced over a month's time is not too much for most children to learn. In February, he would warm up with the first set and then begin learning the second set, which was a mirror image of the first set. (This is the general pattern for most of the Abcedarios, as the odd numbered sets are the "lead" sets, with the next even numbered set as its mirror image). This 12 techniques at a time learning schedule is a much less intimidating way to learn these large sets for a child than learning all 144 techniques from day one.
#13 TO 22: Four Wall “Apat na Paligid” basic entry technique against strikes in a simple timing drill.
I learned this drill in two phases: 1. During the basics; as an emergency blocking procedure. 2. During the advanced classes as an entry. It was common for Tuhon Gaje to have us revisit a basic drill and have us practice it using the theories and principles we had learned during advanced training. In this case, we relearned the 4 Wall as a quick entry timing drill. My practice these days is to teach both methods of the drill as early as possible, since most of my students are adults with prior martial arts training.
#23 to 25 Umbrella “Payong” fluid entry techniques.
#26 TO 31 Tapping against thrusts “Pangising” (also known as Dakup y Punyo) A drill of 3 attacks, 3 counters, and 3 recounters but #26 to #31 in the condensed 64 Attacks. Taught with “Chekete” (direct) and “Echekete” (indirect) counter to weapon-arm pinning drills, counters and recounters.
#32 TO 36: Five Attacks “Limang Sugod” Diagonal attacks, entries, and counter-to- counter drills.
#37 TO 43: Break in-Break out “Pasok Lo’ob – Pasok Labas” Linear attack, entry, and counter-to-counter drills. Taught with “Segang Labo”, a close-quarter engagement-disengagement drill that acts as a platform for close-quarter disarms, traps and takedowns. Break in-Break out drill of Pekiti-Tirsia. Core elements of the drill, with footwork and positioning details.
#44 TO 50: Seven Attacks “Pitong Sugod” Entry, off balancing, takedown or repelling techniques. This set has the only long range, lunging thrust in our solo baston material.
#51 TO 64: Clock System “Orassan." Entries and baits with double force. Introduction to flat-of-the-blade strikes (called in Visayan “Witik” -lit. to flip or whip, but used here “to cheat”; called “Abaniko” in several other dialects).
The majority of the 64 Attacks focus on two man timing drills. The basic symmetrical version of each drill is used as a warm up, to learn the gross motions and instill muscle memory. This is analogous to putting training wheels on a child's bicycle: used only as long as needed and no longer than that. The asymmetrical versions are where you really learn the application of timing and distance control through useful footwork.These drills are a important bridge between learning the basic techniques of a system and full sparing.
The video below begins with an overview of the timing drills and ends with a diagram that explains how we put this all together.
Florete (lit: flower petal) is a short form in Pekiti-Tirsia using two hits per beat; a back of the blade deflection of your opponent's sword cut, then delivering a cut of your own. We learned this set just after 64 Attacks, but I usually test this at the same time as the 64. Since this is the first dedicated sword set I learned, I consider it a bridge set between the basics and advanced material.
]]>
https://pekiti.com/blogs/news/my-thoughts-about-advertising-on-social-media2024-01-31T21:39:34-05:002024-02-28T12:30:15-05:00My thoughts about advertising on social mediaTuhon Bill McGrath
I thought it might be helpful for those also advertising online to see my thinking on this subject, which is based on trial and error over many years. I would be interested in hearing how my experience compares to other instructors who advertise on social media and even more interested in hearing the advice of administrators of these on-line groups.
Here are my thoughts about advertising on social media, specifically Facebook (FB). I thought it might be helpful for those also advertising online to see my thinking on this subject, which is based on trial and error over many years. I would be interested in hearing how my experience compares to other martial art instructors who advertise on social media and even more interested in hearing the advice of administrators of the FB groups I advertise on.
The first place I post is on my own timeline to check how the advert will look on FB. There is often a difference in how something looks on my desktop's word processing program and how it looks on FB. If I have trouble with formatting issues, I will often make the corrections in my timeline and then, once that looks good, copy and paste the corrected version back into my WP program to use as a master.
I try to keep my posts to no more than 10 at a time and spread my posts throughout the hours of that day. This makes it more likely that it will be seen by people who are on FB at different parts of the day. It also makes it less likely that a group's admin will delete it or a company's A.I. will falsely mark a legitimate post as spam. I also leave a gap of at least one hour between my post and the last one on a group (and often more, if it is an admin posting). A little courtesy goes a long way for general good will and to help keep you out of FB jail.
It is also wise to know the rules of the groups you are posting too. Some want advertising only on certain days and some will even limit specific types of advertising to different days (for example, one group I know wants equipment vendors to advertise only on Fridays, while Saturdays are for events and Sundays for advertising your school).
My first post of an advertising campaign is usually a flyer announcing the event with a link to the registration page. This is to get the date on people’s calendar and the target audience are those already likely to attend an event with the instructors shown. I try to post this flyer only two times, at the beginning of the campaign and just before the event as a reminder of the date.
The main advertising for my events takes the form of “infomercials,” where I post a video of something I will be teaching at the event and give a description of the technique shown. I try to make the video and text about it informative, so I am not wasting the viewers time. If the viewers enjoy what they watch, they are more likely to click the link to learn more about your event. I also try to cycle through several different videos for each event over the weeks preceding the event. If you post anything too much, whether the same flyer or the same video, it will begin to "disappear" in the viewers mind. It may also, annoy the group admins and turn them off to allowing you to post on their page.
I will end my infomercial with a link, either to a playlist on my YouTube channel or a link to the seminars list page on my website, such as: For info on this year’s PTI camps, seminars, local and on-line classes, visit the PTI seminars page: https://pekiti.com/pages/upcoming-seminars
Here is how I try to schedule posts for different times of the day, based on my home time in New York (A.K.A. Eastern Standard Time, or EST for short).
MORNING: 8 am to 12 pm EST. I post to groups based in Europe and any groups which requires an admin’s approval, or are so busy that my post may get lost in the flood of other posts during their prime hours. If you do not have as much free time as a retired guy like me, then your lunch break may also work, if you are posting to groups in Europe or Africa from the Americas.
AFTERNOON: 12 pm to 6 pm. I post to Pekiti-Tirsia groups based in the US in this period. I pick this time mainly so I don’t compete with the advertising and on-line classes of other PTI instructors; but since I also do direct advertising via FB messenger and email, (which can be done at prime evening hours) posting at these times also helps to keep my advertising spread out.
EVENING: 6pm to 10 pm. I post to Non-Pekiti US based groups during this period. Since I belong to so many groups (over 100 for my many interests), I try and spread these posts out over these four hours to get better distribution.
NIGHT: 10 pm to Midnight. I post to groups based in Asia and Australia during this time. Since this is such a large geographic area, with several time zones, I only cover part of the afternoon hours of these countries with this 2 hour period.
These days it's usually difficult for me to stay up that late, so I end my advertising at Midnight. If you know how to schedule a post to groups in Asia and Australia so it will show up during their prime viewing times of the evening, please let me know.
Please give me your thoughts on advertising on social media and what types of advertising work best for you. Thank you for your time.
Regards, Tuhon Bill McGrath
PS. You can help the groups you advertise with by reporting scam posts you find on their group pages. The admins for these groups are often just volunteers and don't have the time to police their group pages every day. While minor spam posts can be annoying, there is a rise in criminal scam posts on social media these days. How to tell if a post is a scam? If you see a post from a well known brand advertising a price that's far too good to be true, or the death of a famous person that you know is not dead, or a screenshot of a sexual nature on a group that has nothing to do with these subjects, then it probably is a scam and likely a criminal one from someone trying to take your money or your personal data. You will usually find a 3 dot link on the right side of the post where FB gives you the option to report the post to FB, as well as the group admins. It usually takes just a few seconds to report a scam post and will help the admins keep the group members safe when visiting that group.
]]>
https://pekiti.com/blogs/news/abcedario-de-mano-and-solo-baston-abcedario-overview2023-12-16T16:25:02-05:002024-05-15T09:16:49-04:00SOLO BASTON ABCEDARIO & ABCEDARIO DE MANO: OVERVIEWTuhon Bill McGrathMore]]>
An Overview of the Solo Baston Abcedario and the Abcedario de Mano sets of the Pekiti-Tirsia System.
Originally, the Solo Baston Abcedario was one of the first things taught in the Pekiti-Tirsia system, while the Abcedario de Mano was one of the last things taught.
This was due to the classic way of learning Pekiti-Tirsia, in that the system was originally taught as all the Solo Stick/Sword material first, "A through Z," with all the Double Stick/Sword coming next, then all the Espada y Daga, then all the Daga y Daga, then finally all the empty hand material.
Both the Abcedario and the Abcedario de Mano have 144 techniques, divided into 12 sets of 12 attacks. You can think of each set as an alphabet of 12 letters, while the different sets can represent a different "font" on how that alphabet is printed.
SOLO BASTON ABCEDARIO OVERVIEW:
Grand Tuhon Gaje told us that he spent one full year as a child learning the Solo Baston Abcedario, learning one set of 12 attacks at a time, building up until he had all 144 techniques in the 12 sets. Let's say he started in January with the first set: 12 strikes learned and practiced over a month's time is not too much for most children to learn. In February, he would warm up with the first set and then begin learning the second set, which was a mirror image of the first set. (This is the general pattern for most of the Abcedarios, as the odd numbered sets are the "lead" sets, with the next even numbered set as its mirror image). This 12 techniques at a time learning schedule is a much less intimidating way to learn these large sets than learning all 144 techniques from day one.
SOLO BASTON ABCEDARIO NOTES: (image from my teaching notebook)
ABCEDARIO DE MANO:
The Abcedario de Mano is the empty hand version of this material, with each set involving a different way to strike with the hands, arms and feet. Once the whole 144 is learned, then the student can find which type of strike suits his physical build and personal fighting style and specialize in the sets that use that part of the body. The video below is a sample from the Abcedario de Mano Mini Lesson.
Here is a sample from the Instructor's Notes video on the Abcedario de Mano, showing the solo form as a mnemonic device, then a two man form, then each technique used as a counter to a surprise attack with footwork.
The kick set from the Abcedario de Mano. Notice that no kick goes higher than the groin.
ABCEDARIO DE MANO NOTES: (images from my teaching notebook).
PAGE 1
PAGE 2
Both the Solo Abcedario and Abcedario de Mano have sword or knife based variations which are taught during the instructor's class on these subjects.
SOLO ABCEDARIO BLADE VERSIONS:
Sets 1, 2, 3 & 4: Basic and Reverse. Double Force and Reverse = Bolo.
Sets 5 through 8: Punyo and Hook = Pakal knife.
Sets 9 & 10: Reverse grip and Reverse-Reverse grip = Large blade or sword when you disarm and find the sword in reverse grip.
Sets 11 & 12: Bayonet sets = Pekiti-Tirsia long sword (with long dull section for left hand grip), or a rifle with a bayonet, or a short spear.
ABCEDARIO DE MANO BLADE VERSIONS
Slap sets = Pakal.
Wrist hack sets = pommel of Sak-Sak knife
Forward fist = Pakal
Reverse fist = Sak=Sak or push dagger
Elbow sets = Pakal
Hack sets = Pakal
Eye jab is a small knife held alongside forefinger or thumb
Kick set is simply to practice your kicks with a blade in your hand so you can kick without stabbing or cutting yourself.
The palm stick set and drills share some principles with the blade versions of the Abcedarios, so you can get a general idea of how the blade functions by watching the palm stick material.
For more info on the Solo Baston Abcedario and Abcedario de Mano videos, visit the links below:
Train Hard, but Train Smart!
Tuhon Bill McGrath
Links to purchase related videos and other information:
]]>
https://pekiti.com/blogs/news/certified-trainer-status-the-road-to-instructorship-rank2023-08-23T17:33:55-04:002023-08-23T17:41:30-04:00CERTIFIED TRAINER STATUS: THE ROAD TO INSTRUCTORSHIP RANKTUHON JACK LATORRE
A Certified Trainer is someone who shows competency in a particular curricular block and has been approved to teach said curricular block.
Certified Trainer level tests the student’s understanding of a particular curricular block as well as their communication skills, as an instructor watches them as they 'teach' the technique to a training partner.
In Pekiti-Tirsia International, rank denotes instructorship level: ranks indicates which curricular material an instructor has qualifications to teach.
Lakan Guros are assistant instructors.
Guros Isa through Guro Apat are considered full instructors.
Mataas Na Guro is considered a master instructor and is capable of teaching the entire system.
Magino'o is an elder statesman and respected for particular skills in teaching the entire system.
Tuhon is considered the system administrator and conservationist of the
system.
.
So what is a Certified Trainer?
A Certified Trainer is someone who shows competency in a particular curricular block and has been approved to teach said curricular block.
Certified Trainer level tests the student’s understanding of a particular curricular block as well as their communication skills, as an instructor watches them as they 'teach' the technique to a training partner.
A Basic Test involves the testing candidate showing the 'what' and 'how' of a chosen curricular block. The candidate demonstrates 'what' the techniques are, and 'how' they are to be executed.
The Certified Trainer test is designed to test a student at the level of instructor on that particular curricular block...not just the 'what' and 'how' but the 'why' and 'when', in order to demonstrate a deeper level of understanding. There is also the important aspect of the testing candidate's pedagogy. If the goal is eventual instructorship, an ability to communicate and teach needs to ne demonstated as well.
Upon successful completion of testing by Certified Trainer status, that testing candidate is now 'certified' to teach that particular curricular block to others.
Anyone who holds ranks in the PTI organization should have every curricular block required for that rank up to the level of Certified Trainer status.
The Certified Trainer status empowers a PTI member to teach a curricular block (or blocks) to others legitimately without holding formal rank.
Rank in PTI occurs when certain clusters of curricular blocks are completed and tested to Certified Trainer status.
Certified Trainers will have the official stamp and signature of the testing administrator/full instructor in their PTI Blue Book for each curricular block they have successfully tested in.
Once certain clusters of curricular blocks are signed and stamped by a PTI instructor, rank can be approved and awarded.
I hope this helps.
Best,
Jack A. Latorre
Tuhon
Executive Director
Pekiti-Tirsia International
]]>
https://pekiti.com/blogs/news/2023-learning-through-comparisons-seminars2023-06-24T02:03:41-04:002024-09-02T16:30:30-04:00LEARNING THROUGH COMPARISONS SEMINARS (1980 through the present)Tuhon Bill McGrathMore]]>
The Learning Through Comparisons principle: There are great benefits to be had for both students and instructors when they experience different ways of solving the same problem. I first saw this during my teacher’s joint seminars in the early 1980s with Eddie Jafri and Guro Dan Inosanto.
1981 PEKITI-TIRSIA CAMP. ONEONTA, NY
Lt to Rt front row: Tom Bisio, Eddie Jafri, Tuhon Leo Gaje, Bill McGrath. In the 2nd row you can see Akmeed “AK” Boouraca on the left and a very young Phil Gelinas on the right.
SPARRING AT THE 1981 CAMP
Sparring during the 1981 Pekiti-Tirsia summer camp. Bill McGrath (white vest) vs Akmeed “AK” Boouraca (black vest). The referee is Tom Bisio. This was Tuhon Gaje’s famous training camp in Oneonta, NY. These were amazing camps where Tuhon Gaje and Penchak Silat instructor Suryadi “Crazy Eddie” Jafri used to take turns working us near to death on dawn warm ups and then train Pekiti and Penchak techniques until midnight. It was a great time to be involved with these arts.
Some scenes from a Pekiti-Tirsia and Penchak Silat demonstration in NYC in 1980.
EMPTY HAND VERSION OF A KARAMBIT TECHNIQUE
It was during the late 1970s and early 80s that I learned Silat weapon work from Eddie Jafri. This video shows an empty hand version of a karambit technique I taught a few years ago at Guro Rick Faye's MKG school in Minneapolis, MN.
1983 GAJE/JAFRI/INOSANTO CAMP FLYER
(Left to Right) Tuhon Leo Gaje, Eddie Jafri, Guro Dan Inosanto.
The 1982 & 83 camps were held in Big Spring, TX. These were Tuhon Gaje's first truly big camps after moving his family to Big Spring, TX in 1982. The 1982 camp focused on basics from each teacher, while the 1983 camp continued onto more advanced material.
TWO MAN TIMING DRILLS FROM 64 ATTACKS
Some of the drills taught at the 1982 camp.
Pekiti-Tirsia counter elbow drills using the platform of the Sagang-Labo drill. This is the type of drill we practiced at the 1983 camp.
1995 PTI INSTRUCTOR MEETING/CAMP Left to Right: Phil Gelinas, Guro Dan Inosanto, Bill McGrath, Omar Hakim. Our practice time during this meeting focused on Advanced Doble' Baston material in the Pekiti-Tirsia system.
.
Pekiti-Tirsia Double Stick Contradas
Technique 1 from Double Stick Contradas. In Pekiti-Tirsia, Contradas principles are used when the opponent or his weapon is stronger than you or your weapon, but you have an advantage in speed; so you use multiple, fast hits while leaving yourself an escape route if things don’t go your way.
Pekiti-Tirsia Double Stick Recontras
A drill and technique 1 from Pekiti-Tirsia Doble' Baston Recontras. In Pekiti-Tirsia, Recontras techniques are used when you have a heavier/stronger weapon than your opponent, or when he is faster than you are, or has better endurance and you have to shut him down quickly. Recontras techniques are aggressive and committed to the attack. It's not about charging straight in though, but using the weight of the weapon to your advantage at an angle that limits the opponent's counters.
Group photo from the June 2022 Kali Evolution 5 seminar, where Tuhons Ray Dionaldo, Jared Wihongi and myself taught with a focus on knife material. The two videos below show samples from the principles I taught at this seminar.
PEKITI-TIRSIA KNIFE TAPPING EXPLAINED
The relationship between Pekiti-Tirsia Hand vs Knife and Knife vs Knife.
Pekiti-Tirsia empty hand vs knife is based on its knife vs knife principles. There are several reasons for this. One is that the type of knife commonly carried, such as a pocket knife or balisong, will not function the same way as a large knife, such as a bolo or bowie; in that it is much harder to instantly stop an opponent’s attack with a small knife than it is with a large knife. That is why you see a combination of evasive footwork, to move you out of the line of attack and parries with the forearms or hands, to help control the opponent’s weapon arm, used in both empty hand vs knife and in knife to knife training in Pekiti-Tirsia. Notice how both the empty hand hits and the counter attacks with the knife in this video are not relied upon to stop the opponent’s attack, but are done when the footwork and parries have brought you the time and space to use them. If you follow the same principles and gross motions in all your weapon platforms of the same size, you will have a much easier battle plan to follow during the stress of a fight.
PTI SENIOR INSTRUCTORS
LT to RT: Mataas na Guro Chris Verdot, Tuhons Jack Latorre, Bill McGrath, Scott Faulk and Magino'o Danny Terrell.
The two big camps for PTI are the Spring camp in Louisiana and the Summer camp in New York (with an Autumn camp added in 2025). Even after 48 years in the Pekiti-Tirsia system, I still find myself learning something new, or at least seeing a technique from a new angle, whenever another teacher shows how they teach the material. If I can learn something new after all this time in the art, so can you.
One of the subjects taught at the 2024 Spring camp will be Double Stick Fundamentals.
One of the subjects taught at the 2024 Summer Camp will be the 3rd Set of Espada y Daga.
2023 Joint Seminar and Classes:
Here is a list of the Zoom classes and the in-person seminar I did in 2023; along with some samples of the material my co-instructors and I have taught at these events.
My intro video for Bowie, Axe and Kukri, explaining the Learning Through Comparisons principle:
1. JANUARY, 2023 BOWIE KNIFE: with Bryan Cannata Guro Bryan Cannata: Bryan is a US Army veteran, a classically trained saber fencer and has trained in several styles of FMA, along with traditional American Bowie fighting. He is the founder of Kalis Americano (a blend of HEMA and FMA).
Here is the list of bowie books recommended by Bryan. “Cold Steel” by John Styers “Cold Steel” The art of fencing with the Sabre by Alfred Hutton “Bowie knife Fights, Fighters and Fighting Techniques” by Paul Kirchner.
Contact Bryan through his Facebook group "Atlanta Monthly Meet Up."
2. JANUARY, 2023 TWO HANDED AXE: with Coach Russ Mitchell: Russ is a 30-year "HEMA Dinosaur" and Feldenkrais Method Practitioner, who has trained in a variety of eastern and western lineages. He is the founder of Winged Sabre Historical Fencing, where his teaching focuses on the Hungarian sabre and the Fokos Axe. Another great instructor with (warning!) a sense of humor similar to my own. Visit his YouTube channel: https://www.youtube.com/@russmitchellmovement/featured
Warmup Drill for the PTI Cane Class (with the Cold Steel Axe Head Cane).
3. FEBRUARY, 2023 WALKING STICK: with Instructors John Borter & Trish Chiovari of Doyle Style Irish Stick Fighting. I’ve done two seminars with John and Trish. They know their subject well, are great communicators and are very easy to work with. Contact them via their Facebook group: “The Irish Stick.”
Principles of PTI Walking Stick:
4. APRIL, 2023 PEKITI-TIRSIA SPEAR & ITALIAN PARTISAN: Maestro Devon Boorman. Devon has 30 years experience in Italian martial arts including swordplay, polearms, wrestling, and mounted combat. He is the author of “Introduction to Italian Rapier” and “Introduction to Italian Longsword”, as well as the Director of Academie Duello Center for Swordplay in Vancouver Canada.
5. MAY, 2023 KUKRI/KHUKURI: with Sayaji David Daniel. David is a direct student of Mahasayaji Dr. Maung Gyi in the American Bando Association and National Bando Association of America. He has over 45 years of experience in martial arts with additional experience as a Sifu of Hsing-I and Ba-Gua under Allen Pittman and Tibetan Lion's Roar under Charles Daniel. For more info on David Daniel, join the Facebook group: The American Bando Association and Friends.
Crossdraw and walking guard/carry of the kukri.
6. MAY, 2023 AXE/TOMAHAWK & KNIFE: with Dr. John Lennox. John has trained in various forms of swordplay for over 40 years. Beginning with the katana, he later moved into the western weapon styles. He is a black belt in Kenpo, an instructor with the Historical Martial Study Society, and an expert level knife and tomahawk instructor for the School of Two Swords. Over the past few years he has focused on unarmed combat theory. His recent research includes Aztec, Mayan and Inca combat systems. Since 2006 he has been teaching at workshops all over the world, including the The Shenandoah Project, the Symposium on the Western Arts of Swordsmanship through History (S.W.A.S.H.) in Leeds, England, and numerous workshops in Scotland, England, Finland, Ireland, Belgium, Germany, Australia, Mexico and Canada. He is the author of Combat Theory: The Foundations of the Fight, and is the editor for the posthumous work of Colonel Dwight C. McLemore, The Dagger/Counter-Dagger Concepts of Joachim Meyer. He is routinely called in to colleges and universities for workshops on historical combat and stage combat. John holds a PhD in Theatre with cognate studies in historical fencing from Wayne State University. Website: https://schooloftwoswords.com/
Drawing and use of the hatchet for self-defense purposes.
7. JUNE, 2023 SPEAR-STAFF-CANE: with Punong Guro Marc Denny & Instructors John Borter and Trish Chiovari.
Punung Guro Marc Denny is the founder and head instructor of the Dog Brothers Martial Arts organization. For more info on DBMA, visit: https://dogbrothers.com/
Guro Marc teaching Dog Brothers Martial Arts Short Staff.
How to draw the spear from its carry position to its guard position in the Pekiti-Tirsia system.
A sample from a class on Doyle Style Irish Stick Fighting, taught by Instructors John Borter & Trish Chiovari. For more info on Irish Stick Fighting, join the Facebook group "The Irish Stick."
A sample from the PTI walking stick class in Wappingers Falls, NY on June 10th, 2023.
. 8. JULY, 2023 MACHETE: with Joe Flowers for self-Defense and Bushcraft use. Joe Flowers is the owner of Bushcraft Global. As a knife designer, Joe Flowers has over 150 Knife and equipment designs for various knife and outdoor companies. Joe’s love for machetes and the outdoors teamed him up with companies like Condor Knives, and his machete and knife designs are well known throughout the knife and outdoor world.
At Blade Show in Atlanta, Joe teaches Blade University bushcraft classes. He was also on the board of directors for the first Global Bushcraft Symposium in 2019, and is on the board of the UK Global Bushcraft Symposium in England, as well as teaching there. Joe was a Subject Matter Expert (SME) at the 7th Special Forces Group, Jungle Warfare Symposium on jungle survival in 2022.
A sample from Joe's lecture on the history and survival uses of the machete in various cultures around the world.
The Machete; a bridge between stick and sword for FMA practitioners. A sample from my class on the self-defense use of the machete.
9. February 25th 2024 Zoom class with Guro Bryan Cannata on improvied weapons in the Medusa System, Guro Dean Franco on use of the tactical flashling in the Piper System and Tuhon Bill McGrath on 3 tools used in the Pekiti-Tirsia system.
For information on upcoming Pekiti-Tirsia classes, seminars and camps, visit:
]]>
https://pekiti.com/blogs/news/knife-testing-part-1-get-the-point2023-05-10T21:26:00-04:002023-06-03T09:59:11-04:00KNIFE TESTING (part 1) : GET THE POINT?Tuhon Bill McGrath
KNIFE TESTING (part 1) : GET THE POINT? Help me design a process to test a blade’s thrusting ability for use in self-defense blades.
Note: My overall goal for this project is to develop testing procedures for knives compatible with self defense needs, while keeping the knife useful for the 99.9% of the time it will be used for day-to-day knife chores.
Ultimately, I would like to have a competition for self-defense knives similar to those for outdoor knives (as seen in the 3rd video below). However, this essay will focus on point design.
INTRODUCTION:
KNIFE BOX TEST:
BACKGROUND INFO & REQUEST:
There are many ways to test a blade’s cutting ability. On small knives, you can cut paper, plastic bottles or cardboard tubes.
On larger blades it is common in western cutting competitions to chop through dimensional lumber such as 2 x 4s, cut thick pieces of free hanging rope, or press cut through various tough materials. Among Japanese sword fans, cutting Tatami mats is the traditional choice.
As long as the swords or knives being tested are all cutting the same materials, then you have a good “apples to apples” comparison among the blades being tested.
With the exception of the katana and other blades being tested on the tatami mats (said to simulate the cutting of a similar thickness of human limb), most cutting competitions are done to simulate, not the needs of war, but outdoor tasks, such as those required by the recreational outdoorsman of today.
These tests sometimes lead to overspecialization in blade design to meet the needs of each competition. In western blade competitions, such as those seen at large knife shows, the blades have evolved from big knives that resemble 19th century bowies, to blades that look like long, rectangular meat cleavers with square ends that have no points whatsoever.
We can’t blame the knifemakers for this though. If the rules state that the blades must be no longer that 10 inches in length and the handles must be 5 inches or less, and that the competition will solely be to chop or cut things, then you want a blade whose “sweet spot” or “point of percussion” is as far out on the lever of the blade as possible, and this is going to resemble a meat cleaver, as this is the best design for that task.
In the video below you will see two types of tests: One type is a pass/fail test (as when a competitor cuts through a free-hanging rope in one slice). The other type measures quantifiable differences between blades (as when a competitor cuts through a section of 2x4 lumber in a shorter time than other competitors).
A pass/fail test for the thrust with a large knife could be thrusting into a coconut that is hanging by a cord. If the coconut is split and the water spills out, the competitor has passed.
What I need help designing though is a testing procedure for the thrust that measures quantifiable differences between knife designs: the equivalent for the thrust to the timed chop tests on the 2x4 seen in this video.
In either case, I would like a test that has results immediately visible to spectators, with no need of measurements by judges after the competitor’s run.
BLADESPORTS WORLD CHAMPIONSHIP
Meanwhile, in one of my favorite TV shows, “Forged in Fire” my old student Doug Marcaida has his “Kill Test,” which is specifically designed to test the combat capabilities of edged weapons. In this video Doug uses a Filipino Barong in a sharpness test and a kill test. You can scroll around this video as Doug moves from test to test, following the action between the three stations. (You can pan around the room using the button on the upper left of the screen, or you can hold your curser down and drag right or left to follow the action).
FORGED IN FIRE: 360 SHARPNESS & KILL TEST
While these tests are great fun to watch, I don’t have the budget to purchase ballistic dummies or whole pig carcasses.
Therefore, if we want to create a process to test point design for the thrust on a self-defense blade, how can we do that and make it repeatable with consistent materials, affordable for most martial artists?
In video marked “BOX KNIFE TEST” I showed my first attempt at a testing device. It is a cardboard box, with a 5 pound weight on top to control how far the box slides when you thrust a blade into it. It’s not a perfect test, but it is a place to start. Please give me your suggestions on how to improve this process. The testing device must be simple to construct, affordable and consistent from piece to piece.
Regards, Tuhon Bill McGrath PS: This device is intended to test how various tip designs overcome resistance to penetration.
To text tip strength and handle design, one idea would be to test large knives by thrusting them into a suspended log so that they get stuck and then twisting them out without damage.
I could also use your help in designing a test for tip strength appropriate for thin bladed folding knives.
UPDATES: Some good suggestions I've received on this topic.
An option for the pass/fail thrust test for large blades could be using a log suspended horizontally. The knife would be thrust into the end grain with enough force to stick into the wood and have to be retracted with enough force to swing the log back towards the user. I think these types of hard impact tests should only be done with large knives with good guards though.
On smaller knives, with no guards and thinner blades (such as many folders), then a softer material should be used for testing. A good suggestion I received was a stack of cardboard sheets covered with a piece of cloth. If we backed these up with a dye filled balloon, then results could be immediately seen by spectators, without the need to have measurements taken by judges.
]]>
https://pekiti.com/blogs/news/fma-training-tools2023-04-29T01:18:42-04:002024-01-24T21:24:39-05:00FMA TRAINING TOOLSTuhon Bill McGrathMore]]>
FMA TRAINING TOOLS
A discussion of the pros and cons of various materials for training in Filipino Martial Arts, by Tuhon Bill McGrath
RATTAN
The first material that comes to mind for training in Filipino Martial Arts is, of course, sticks made from rattan. The pros of rattan for training are many, but we will focus on two here; one being that it is relatively light in weight (when compared to hardwoods) and the other is its flexibility. These two factors make it a good wood for FMA students to begin their training with, as the light weight means that it is less likely to break a training partner’s bones during an accidental hit. Rattan’s flexibility also helps the joints of the user, as this lessens the shock and vibration that gets transferred to the user’s joints on impact. This lessening of shock to the joints helps prevent tendonitis in the joint and is said to also help prevent arthritis in the joints, compared with doing the same training with an inflexible hardwood. When we began our training with Tuhon Gaje in the 1970s, we used to call drills with rattan sticks “Filipino Iron Palm Training” because of the effects it had on our hands. A more detailed description of this can be found in this video.
TOP: A Hickory trainer I made by cutting an axe handle down to match the size of my short sword.
BOTTOM: A much nicer version done by Magino'o Dan Terrell.
While we used lightweight rattan for drills and sparring, Tuhon Gaje had us use hardwoods for hitting the tires for power development. The wood used for this was commonly Bahi, which came from heart of the Anáhaw palm. (1) Tuhon Gaje also chose Bahi wood for his personal fighting sticks as a leader of dock workers in the 1960s (where the “negotiations” for the contracts to unload the ships resembled gang wars. But that is a story for another day). Another hardwood commonly used for fighting in the Philippines was Kamagong (2). This was not as favored though by Tuhon Gaje, as it was more brittle than Bahi and was prone to break suddenly, leaving you with a shortened weapon in the middle of a fight.
For the last few years, we have been working with hickory, which is one of the highest rated hardwoods for impact resistance and is therefore used on tool handles that need to be tough, such as axe, pick and sledge hammer handles. Several years ago, Guro Dan Terrell made some wooden sword trainers from hickory axe handles (3) for his fellow PTI instructors and they have become our favorite wooden sword trainers for any task that requires surviving repeated hard impact. PS. I have tried oak in the past and it did not hold up well.
POLYPROPYLENE
My first polypropylene trainer was an Escrima Stick from Cold Steel. I like these sticks for hitting tires as they have the weight of a hardwood fighting stick, but also have the flexibility of rattan to help protect your joints. Since the polypropylene trainers I have are all factory made, they are relatively inexpensive.
ALUMINUM
.
I no longer allow aluminum trainers in my classes. Here’s why: Aluminum may not be as hard as steel, but it is still a metal and it can break bones if you strike hard with a trainer made from it.
Aluminum stays fairly stiff when in the thicknesses commonly used for sword and knife trainers. There have been cases where fighters have used aluminum trainers for full contact sparring and have had a training knife penetrate an armpit (they got lucky that the point did not penetrate the Brachial artery or nerve plexus). I did an experiment after hearing about this incident and tested an aluminum knife on an old fencing mask. I took the mask, put it loosely on a stick and did a quick thrust on it. The blade penetrated the mask half way up the blade.
In addition, aluminum is relatively porous for a metal and will hold bacteria in any rough spots which can cause an infection if you get scratched by that spot. I was given this info by a custom knife maker who had experienced repeated problems using aluminum blade blanks causing infections during use. An experienced martial artist told me of another issue with aluminum trainers. While aluminum is softer than iron, it is harder than calcium and will chip a tooth with even light contact.
H.D.P.E. (High Density Polyethylene)
HDPE is my current favorite material for realistic sword and knife trainers. I have gotten mine from Chris Byron at Vulpes Training. In this video you will see me hitting the tires with a Pekiti Longsword trainer. The vibration was dampened nicely, while still having good impact on the tires. .
H.D.P.E. VS POLYPROPYLENE
In this video I demonstrate how tough the HDPE polymer Vulpes uses while striking hard against a suspended log. I contrast this to a polypropylene Axe Head Cane from Cold Steel. I was hitting the cane against suspended car tires and had the sharp points break off. Coming to such a sharp point as the axe head was, this was likely to happen sooner or later. I really like the HDPE for “bag work” with edged weapon shaped trainers, as it seems to hold up better than the softer polypropylene.
SANTOPRENE
Santoprene is a mixture of synthetic rubber broken into particles and then encased in a polypropylene matrix. I have been using Cold Steel’s Sontoprene training knives for several years now and really encourage my beginners to use these in knife training as they are lightweight, moderately flexible and inexpensive. Therefore, if a beginner makes a mistake while practicing a partner drill, he is much less likely to cause his partner serious injury than if using a hard polymer or wooden trainer. In this video, my son and I are working on a warm up drill for the 2023 camp that shows a transition from a simple boxing drill to the double knife version of the same drill.
HDPE VS SANTOPRENE IN BAG WORK
.
One place I prefer HDPE over Santoprene, even for beginners, is when doing bag work, be it on a tire stack or heavy bag or rubber dummy. As I explain in this video, the attributes that make the Santoprene safer in partner drills, (its light weight and flexibility) make it ill suited for solo bag work, as the softer material gives you less feedback when hitting a target, compared to the harder, heavier and more rigid HDPE.
SMALL TRAINERS
Another place I prefer using HDPE over Santoprene is when advanced practitioners are doing partner drills; especially those drills that involve simulated “cuts” to the partners arms. Santoprene being partially made of rubber, it seems to be more “sticky” than the harder polymer and can cause a friction burn if done repeatedly during a long practice session. HDPE being a hard polymer can be polished smooth and therefore, is more likely to slide over the skin with less friction. I still recommend that students wear arm guards when practicing these kind of drills, but find that hard, smooth polymers such as HDPE are more forgiving than softer rubber when it comes to preventing abrasions due to friction. .
.
Well, there you have it. My thoughts on the pros and cons of different materials for FMA training. As always, train with an experienced FMA teacher and be responsible for your own actions.
]]>
https://pekiti.com/blogs/news/learning-through-comparisons-pt-4-bowie-vs-kukri-vs-tomahawk2023-04-08T20:10:00-04:002023-12-12T23:28:05-05:00LEARNING THROUGH COMPARISONS PT 4: Bowie vs Kukri vs TomahawkTuhon Bill McGrath
LEARNING THROUGH COMPARISONS PT 4: Comparing speed and power between the Bowie, the Kukri and the Tomahawk. 8 videos with text. Tools used in this essay: Cold Steel Leatherneck Bowie, Laredo Rubber Trainer, Gurkha Plus Kukri, Rubber Kukri Trainer, Trail Hawk and an Axe Head Cane cut down to the length of a Trail Hawk.
COLD STEEL AXE HEAD CANE, (cut down to the length of a Trail Hawk) Original weight and length: Weight: 29.3oz Overall Length: 38” Material: Polypropylene
NOTE: If you have any problems viewing these videos, try switching to a different brower.
BOWIE VS KUKRI VS TOMAHAWK. Introduction:
The purpose of this essay is to show an apples to apples comparison of three different tools, a bowie knife, a kukri and a tomahawk. “How could this be an “apples to apples” comparison you ask? Because the same person is using these tools to cut the same items with the same techniques.
Picture a force generator (like a V6 engine or the muscles of your body). You can put that V6 engine in a lightweight sports car, or a mid-weight pickup truck, or a large cargo van. The acceleration is going to be different in each vehicle because of its weight. You are the engine and the different weight blades are the different weight vehicles.
What kind of transmission is being used to transmit the power of the engine to the wheels is another factor. While a sports car’s transmission is geared for speed, a 4WD transmission helps for off road use with a 4X4 truck and a transmission geared for good MPG for a delivery van may be different than either.
Your grip on the blade’s handle is the transmission to give you control over your blade. A one hand grip gives you good reach, but less control. You might place your left hand on your right wrist to add extra power and control, but you will loose some reach. If your weapon handle is long enough, than using it with two hands will give you better control, but again, you will loose some reach.
As you watch the following videos, I would like you to look for two things: one is the lag time between cuts (generally, the heavier the tool, the more difficult it is to change direction quickly at speed with the same grip). The other thing to watch for is when a tool gets stuck in the cutting material and what technique I use to extract it or prevent it getting stuck in the first place.
SPEED BASE LINE: CUTTING IN AIR
TIRE DRILL WITH POLYMER TRAINERS
CUTTING A CARDBOARD TUBE
CUTTING A STATIONARY WOODEN POST
CUTTING A SWINGING THIN LOG
CUTTING A SWINGING HEAVY LOG
Did you notice the differences between the tools, the grips used to move them with speed and control, the different techniques used to solve problems as they occurred?
If you did, congratulations, you were Learning Through Comparisons!
Train Hard, but Train Smart, Tuhon Bill McGrath
My Learning Through Comparisons video series: 3 videos, $35 each for non-PTI members. PTI members: Use this year's PTI Member Discount Code to receive 25% off this price. https://pekiti.com/collections/all/basic-videos?page=4
]]>
https://pekiti.com/blogs/news/how-long-helps-short2023-03-25T01:00:55-04:002024-07-13T10:37:06-04:00HOW LONG HELPS SHORTTuhon Bill McGrathMore]]>
HOW LONG HELPS SHORT
How long weapons, such as staff and spear, can help you develop speed and power with your shorter weapons, such as sword, stick, knife and hand.
By Tuhon Bill McGrath.
As is common to many martial arts and sports, power is often first generated in a different area than the final area seen moving. One place that often acts as a “step-up transformer” for our power generation in Pekiti-Tirsia is the body’s core, the area of the abdomen, obliques and lower back.
In this essay, I will show a number of exercises and their principles of use to help develop speed and power with several different weapons, from long to short. In fact, one shortcut to learn these principles is to start with long weapons, which will highlight the muscle groups and movements involved.
I appreciate this “long helps short” principle now, but that was not always the case.
When I first started training in Pekiti-Tirsia, I was a very skinny fourteen year old. As a teenage boy in 1975 New York City, I was only interested in learning empty hand and knife techniques and thought these were the only parts of Pekiti-Tirsia that would be of any practical use for me. It was only as I went through my twenties and began sparing people outside of Filipino Martial Arts or Penchak Silat circles that I began to appreciate how training in long weapons helped my speed and power in short weapons, such as empty hand.
NOTE ON VIDEOS: If you are having problems playing videos in this essay, try switching your brower to one that allows "pop ups." This is what allows embedded Youtube videos to play on this page. Pop ups are also what allow the cart page to function properly when you place an order on the store page. In most browers you can go into preferences or settings and name specific websites to allow pop ups.
THE “HOT” BREATHING EXERCISE
Here is the first exercise I learned when I started class with Tuhon Gaje. He had me start the first 30 minutes of class with what I thought was just a breathing exercise to build me up (I was a really skinny kid in those days). As you will see in the video, there is a breathing component to the exercise, but the real benefit of it was to learn how to coordinate your hips and put them into use during a strike. I believe Leo learned this exercise from his friend Edwin Renonos, who was a Kuntao instructor. When Leo had us cross train with Edwin in the summer of 77, this exercise was the first thing he taught us and was the basis for Edwin's main blocks and footwork.
CORE SPEAR EXERCISE
So, this is how I started training, but as I got older and started teaching, I began to see how many types of weapon training interconnect and how to develop shortcuts to help teach these principles in a much faster way than how I learned them.
SHORT POWER HITS WITH THE SPEAR
If you don’t have room to do wide swings with a spear, but do have access to a tire you can hit; then you can also learn these principles through hitting the tires, which is our equivalent of a boxer hitting the heavy bag.
SPEAR DESIGN AND DRAW CUTS
Some design elements of the spear, plus the usefulness of the draw cut.
DRAWING THE SPEAR
How to draw the spear from its place of carry to its guard position.
SHORT STAFF EXERCISE: HITTING THE TIRES
Here is an exercise I would often use to help a new student learn to generate power in his stick strikes. Note: while I mention using a baseball bat for this drill, you should not use a wooden bat for this, as I have seen them break when hit on the wrong part of the grain. Instead use an aluminum bat or one of the polypropylene models from Cold Steel.
STICK CORE EXERCISE
Here is a version of this exercise using a Kali/Escrima/Arnis stick. I like to use the durable polypropylene Escrima sticks from Cold Steel instead of rattan for this. If you would like a sword trainer for this drill, then you should look at the polymer trainers from Vulpes Training (1)
PEKITI-TIRSIA GRIP COMPARISON DRILL
Here is the two man drill version of the exercise I mention at the end of the stick core video.
2 HANDED RETURN CUT
Here is a sword trainer that is designed to accommodate a variety of grips; along with some samples of how to use the core power principle in sword work. See the Vulpes Training website if you would like a version of this sword trainer custom made to your measurements.
RETURN CUT STRAIGHT SWORD
You can also use your left side to “bounce” the sword back into a faster backhand cut. I have seen this principle used on heavy swords such as Kampilans. There are two ways to use this backhand movement you see in the video. One is a standard backhand cut with the edge. The other is a hit with the flat of your blade, when you need to to knock the opponent’s sword out of the way. This is a useful move, if your sword is heavier than his.
CURVED SWORD RETURN CUT
Here is a similar principle applied with a curved sword (and the reasons for the differences).
SWORD & KNIFE
Using the core principle to move a sword or knife at greater speed.
MATRIX FOOTWORK DRIILS FROM PEKITI TIRSIA INTERNATIONAL
Here is a sample of punching the heavy bag using power generated from the core.
MORE VIDEOS ON SPEAR:
Spear training in a small space.
A sample from the PTI video, Warm up Drill for Spear, set 1
Please remember to wear protective eye-wear whenever you are training with a weapon, even a polymer training sword or wooden stick or spear.
Train Hard, but Train Smart, Tuhon Bill McGrath
]]>
https://pekiti.com/blogs/news/how-to-measure-pekiti-tirsia-long-and-short-swords2023-02-18T12:00:00-05:002024-07-26T20:06:14-04:00How to measure Sticks, Swords, Knives and Spears in the Pekiti-Tirsia System.Tuhon Bill McGrathMore]]>
I have been asked many times to give the measurements of the Pekiti-Tirsia long sword shown in the PTI logo. The information on the measurements was told to me many years ago by Tuhon Gaje. In this essay I will give the measurements for two swords, the long sword shown in the PTI logo and the short sword that Tuhon Gaje is often shown holding in the photos of him from the early 1980's. I am also including the measurements for training sticks and spears, as well as knives intended for use with Sak-Sak and Pakal grips.
THE TRAINING STICK (BASTON)
Pekiti-Tirsia Long Sword Measurements: The total length, minus the pommel, is equal to the length of your training stick. The double edge portion on the tip of the sword is as long as your hand, measured from wrist to fingertips. The spine measures one cubit (from your fingertips to your elbow).
The grip portion is the full width of your hand. (The oversized guard on the Vulpes Training polymer sword you see in the video below is intended to be large enough to use while wearing padded gloves for armored sparing).
PEKITI-TIRSIA LONG SWORD MEASUREMENTS
The Pekiti-Tirsia long sword is based on a mix of the Pinute sword common to Tuhon Gaje's home island of Negros and a Cutlass with a bell guard, which was a common sword design for many navies of the 19th century.
.
An antique (possibly pre-WWII) pinute. This is the type of sword Tuhon Gaje's grandfather Conrado Tortal would have been familiar with.
This pinute strongly resembles the ones Tuhon Gaje had made for us during the 1982 training camp. This design was the de-facto "official" Pekiti-Tirsia long sword we used in the 1980s.
.
How to make a pinute sword from a leaf spring. (From JP at Bohol Blades.)
A modern Pinute made by Bohol Blades
(Photo courtesy of Will Renfroe).
Some 19th century Naval cutlasses. This design was common among navies of that time. Tuhon Gaje said his grandfather really liked the bell guard on this design.
.
MEASURING THE PEKITI-TIRSIA LONGSWORD
The first thing to understand is that these measurements are intended to customize each sword for each individual. A man who stands 6'1" with a 32 inch long arm will use a different sword than a man who stands 5'6" and whose arm is 28 inches in length. One size does not fit all when it comes to your personal sword.
The first measurement you will need is your "cubit." A cubit is the measurement between your fingertips and elbow. My cubit is 20 inches.The spine of your sword, before the back edge begins, should measure one of your cubits.
The next measurement you will need will be the length of your hand from wrist to fingertips. For me this is 8 inches. This will be the length of the back edge of your sword. This is also the difference between blade lengths of the short and long swords in Pekiti-Tirsia. The spike you see at the point where the spine transitions to the back edge is there to help prevent over-penetration during a thrust.
Next you will take that same hand length measurement and add that to the front cutting edge. You should end up with the front cutting edge being twice the length of the back cutting edge. This main cutting edge should be centered at the "point of percussion." This is the point where the sword hits the hardest and has the best cutting ability. You have a visual reference on this sword, as the point of percussion should line up with the top spike.
The bottom spike you see on my trainer at the top of the dull portion of the blade is actually a guard to protect your hand from sliding up onto the sharpened portion of the blade.
In historical western sword technique, a fighter taking a grip on the blade is called "half-swording." Half-swording was done with all types of swords, but sharp, double edged ones were best gripped while wearing gauntlets. However, you do see several sword designs in the Medieval and Renaissance periods that had a long dull portion on the bottom half of the blade. The design of the PT long sword, with the bottom half of the blade left dull at full thickness, helps in the "half swording" spear grip techniques seen in some advanced PT material such as Seguidas and Recontras.
A knight "half-swording" his blade for more control for thrusting into a gap in his opponent's armor.
The Cold Steel Greatsword you see here has a long, leather covered grip area between the main crossguard and the subguards. (The subguards give extra protection to your hands, should an enemy's weapon slide down your blade while half-swording.)
Here are two videos I recorded at the Doge's palace museum in Venice, Italy. You can see several greatswords in the display cases.
PEKITI-TIRSIA SHORT SWORD MEASUREMENTS:
This is a sword Tuhon Gaje had made for him based on his Grandfather's "house bolo" in the early 1980s. When he showed it to me I didn't think it would be this broad and heavy. This sword was a real beast of a blade and his description of his grandfather's sword sounded like it was lighter and quicker in the hand than this blade was.
The advantage of a short sword comes in during close quarters fighting. We called this sword "Grandpa's House Bolo" because we thought of it as being used inside a house, but the design probably started out as a farm tool and then was adapted for fighting. The broad top helps bring the point of percussion very near the end of the blade.
"What's the weird tip on the sword for?" Well, I was told that the concave edge at the top of the blade helps prevent over-penetration. However, a thrust with this blade is not for targets to the torso, but to the joints, such as the shoulder: using the bones of the joint as a cutting board and capturing the tendons in that sharp concave edge.
You see that toothed base on the blade on some older types of kris, especially those from Indonesia and the Southern Philippines. They are intended to catch the opponent's sword if it slides down your blade. On the version originally described to me, the guard is a simple steel disk and of a size just large enough to cover your hand.
Note: The swords Tuhon Gaje had made for us in the early 1980s, were made for the Angelsword company by craftsmen in Mexico from truck leave springs, so that may account for their thickness and weight. Daniel Watson, the owner of Angelswords, has since gone on to making his own swords and his new designs look lighter in weight and much better balanced than Tuhon Gaje's old short sword was.
The blade that's second from the left is a traditional farm blade that may have been the inspiration for Conrado's House Bolo. (Photo courtesy Will Renfroe/Bohol Blades).
Here is an axe handle I cut down to yield a "blade" length of one cubit. It makes an excellent short sword trainer. The fork on the pommel is to help in the disarming of swords by levering their blades out of the opponent's hand.
The lighter stained wood is from a thick axe handle from Home Depot, which cost me a whopping $15. The darker stained wood is from a lighter weight handle that I got from Lowe's for only $10.
I was introduced to converting hickory axe handles into inexpensive sword trainers several years ago by Coach Dan Terrell and have been enjoying experimenting with these ever since. Here are two different trainers intended to train two different sets of Pekiti-Tirsia.
The top trainer comes from a Lowe's replacement axe handle and the bottom one comes from Home Depot. You can see some cross hatching I cut into the lighter stained trainer, but there is similar cross hatching under the grip tape area as well. I had made the darker colored, lightweight trainer as a promotion gift for those that passed their Lakan Guro testing at our 2019 Contradas camp. I thought it would be cool to take the same axe handle trainer and make a grip on both ends, so that we would not need grip tape (hence the cross hatching on each end). This would keep both ends free to hold.
Want a fast, more controlable trainer for Contradas? Hold the heavy end in your hand and the lighter end will move faster. Want a hard hitting trainer for Recontras training on the tire stack? Then hold the lighter end in your hand and the heavier end will hit harder.
Here is a two man drill that trains the different grips and types of timing you will see in Pekiti-Tirsia Seguidas, Contradas and Recontras:
A STEEL TRAINER?
Here are three machetes I purchased looking for a steel short sword trainer. My intent was to dull the edge and make a real weight, short sword trainer.
The only machete I actually use is the one on the bottom, which I modified for bushcraft use (instead of Pekiti-Tirsia training), as per Dave "Mac" Macintyre's instructions in this video: (Mac is the winner of the second season of the History channel series "Alone" and a true survival expert).
KNIFE MEASUREMENTS IN PEKITI-TIRSIA:
KNIFE FOR USE IN SAK-SAK GRIP: (A.K.A. "Hammer Grip") According to Tuhon Gaje, the minimum blade length for a knife used in hammer grip, or other blade foreward grip, should equal the length of your hand, fingertips to wrist. For more on this subject, read my blog essay "BIG VS SMALL. Does Size Really Matter?" (See the link section at the end of this essay).
KNIFE FOR USE IN PAKAL GRIP: (A.K.A. "Icepick Grip")
Tuhon Gaje taught us taught that a knife should be used in icepick grip when its overall length is equal to or shorter than the span between the outstretched tips of your thumb and pinky finger. Why? Because this lessens the chance of cutting yourself when grappling in icepick gip. For me, this measurement yields an icepick grip knife with an overall length of 9 inches, excluding any part of the handle that extends past my thumb. In the diagram that heads this essay, you will see a small dagger laid along the forarm on the figure's left side. This is using a measurement of the overall length of the knife fitting in a space between your wrist and the beginning of your biceps at the elbow joint. That is another way you can measure a knife for icepick grip. My advice though is to take these measures with a ruler and then apply them to a knife, instead of placing a sharp, pointy knife blade on your forearm or hand, to see if the knife will fit.
Note: When Tuhon Gaje first started training us on knife use, he started us with the knives we could legally carry in New York City, which was a knife with a blade no longer than 4 inches. When we moved to Texas and could carry larger blades, we spent more time training in hammer grip, since that is a better grip for larger blades.
.
PEKITI-TIRSIA ESPADA Y DAGA TOOLS MEASUREMENT
Measuring the sword and knives for sets 1, 2 & 3 of Pekiti-Tirsia Espada y Daga.
PEKITI-TIRSIA SPEAR
SPEAR: The shaft matches your own height. The spear blade is the length of your hand.
I used the same design for the spear head in this image as the dagger used in the PTI logo. This was done to give us a dual use capability with the spear. It is common in Pekiti-Tirsia spear techniques to give a hard strike with the spear's socket and then do a draw cut before a thrust. Therefore, the straight side of the spearhead is needed so the cut and thrust can be done quickly, without getting caught up on any protrusions. Meanwhile the curved side of the spearhead extends out beyond the shaft, so that side of the spear head can be used for hooking techniques. The design also has a spike on the bottom end of the shaft, which protects the wood from wear while walking and can be used offensively in a fight.
The way the head that attaches to the shaft can be a socket (a built-in tube below the blade), or a tang hidden within the shaft. The socket type is the strongest way to attach a metal spearhead to a solid wooden shaft, but the hidden tang type is common on thrusting spears made of bamboo. The PT spear design uses a socket head mounted on a rattan shaft, due to an equal use of strikes and thrusts in its techniques. However, we are working on a polymer trainer with Vulpes Training that uses a hidden tang design that makes the best use of the polymer material and helps lighten the weight of the training tool. I will post pictures of this trainer once the prototypes are finalized.
. How to measure the spike end of a Pekiti-Tirsia spear trainer and where to add a tactile indicator so you know where the spike is during practice.
PEKITI SWORDS IN MY FANTASY NOVELS
I used the Pekiti long and short swords as the base for the two swords the hero uses in my fantasy novel Asulon. Look closely and you can see the hero in the center of the book cover holding a sword based on the Pekiti-Tirsia short sword.
This short sword rides in a scabard on his belt, while his larger war sword rides in a scabbard attached to his horse's saddle.
For the war sword, I simply put a longer handle on the Pekiti-Tirsia long sword and made a Medieval falchion-like sword with a cavalry saber's knuckle guard.
A Medieval Falchion
This video gives a look at the simplified version of Pekiti techniques I used to form the sword fighting style the hero uses in my novels:
Train Hard, Train Smart, but remember to have fun while doing so.
]]>
https://pekiti.com/blogs/news/learning-through-comparisons-part-3-axe-head-design2022-11-19T12:43:37-05:002023-04-17T11:26:44-04:00LEARNING THROUGH COMPARISONS: Part 3. Axe Head Design.Tuhon Bill McGrath
WHY LEARNING THROUGH COMPARISONS? This course is based on comparing the use of three categories of tools as weapons, the bowie knife, the kukri and the axe/tomahawk. My goal is to show you how to recognize both the pros and cons of each design and how to use them effectively, taking into account their strengths and weaknesses.
WHY LEARNING THROUGH COMPARISONS? This course is based on comparing the use of three categories of tools as weapons, the Bowie knife, the Kukri and the Axe/Tomahawk. My goal is to show you how to recognize both the pros and cons of each design and how to use them effectively, taking into account their strengths and weaknesses.
.
V1: Some pros and cons of using a tomahawk as a combat tool.
Note: If any video on this page won’t play, try switching to a different browser.
.
PTI TOMAHAWK TRAINING: Gear and Principles. Some considerations to think about when training with a tomahawk for self-defense purposes.
. Let’s examine ax head design and compare the differences between axes designed as: a Woods tool, a Weapon, or a Combat/Utility multi-tool.
.
V2. INTRODUCTION:
The tools seen in this video:
MAULS: (Fishkars X15 and a cheap hardware store maul shown), I use the first two axes shown in the video for splitting logs. Notice how thick the bits are. They are used to split logs that have already been cut to length (by a chainsaw these days, but previously, by a handsaw). Mauls are designed to act as a wedge and are used to chop into the end grain of a log to split it apart along the grain.
Fiskars X15: For some strange reason, Fiskars markets this as a felling axe, but as you can see in the video, it has a thick wedge shape, better suited for splitting logs.
FELLING AXE: ( Estwing “Camper’s” model shown in video. Council Tools Double Bit axe in photo below). The Eastwind axe has a much thinner blade than axes made for splitting logs. This design is common with an axe intended to “fell” a tree; to cut it down and, if you had no saw, to cut it to length. It is designed to cut deeply across the grain, separating the fibers. I will put the Estwing in the toolbox of my truck when we are expecting a bad storm and have used it more than once to cut the branches from a downed tree across our road. I then section the tree's trunk with a large folding saw, cutting it into lengths light enough to move off the roadway. Here's the saw I keep in my truck. It's a Silky brand Bigboy.
A note on the double bit axe. This kind of axe was often used to clear land, with one side sharpened to a fine edge, which would bite deeply into the trunks of trees to fell them with fewer strokes. The other edge was sharpened at a steeper angle for rough work, such as chopping into roots, where the bit might strike the ground and the thicker edge would help prevent chipping.
CAMPING AXE: (Cold Steel Trail Boss) The third axe shown in video V2 is a good compromise design for both light felling and splitting. This style of axe, with a blade that's in-between a maul and a felling axe in thickness and a handle just long enough for use with two hands, is often sold as a camping, bushcraft or hunters axe. Note the tape on the handle to help prevent the wood from splitting if I miss my target and keep the head from flying off.
.
V3. Basic Axe Skills-Tree Felling:
(From one of my favorite youtube channels The Grey Bearded Green Beret)
V4. Basic Axe Skills II Bucking and Splitting:
.
V5.WAR VS SELF DEFENSE: Techniques designed for use in ancient warfare, with your brother warriors fighting beside you, may not work well in a modern self defense situation, where you might be fighting alone against two or more attackers.
Note: A Cold Steel Norse Hawk on a 30 inch handle was shown in the video below, as this was the closest thing I had to a long handed Viking axe. A Cold Steel Viking Axe with a 10" head and a 52" handle would have worked better for this demo, if I had one.
.
LAGANA VIETNAM TOMAHAWK: As explained in the V5 video, this design helps mitigate a major problem in using an axe for self defense purposes, namely getting your axe stuck in bad guy number 1, while bad guy number 2 is attacking you. The SOG Tactical Tomahawk is shown in the video. If you would like a version of a Lagana style hawk that’s closer to the original than the SOG, I would recommend the American Tomahawk company’s Model 1 (with the hickory handle if you want authenticity, but the nylon handle if you want toughness).
V6. A 1999 interview with Peter Lagana:
CRKT KANGEE T-HAWK: This is the tool I keep in my Urban Get-Home-Bag, as it is the smallest breaching tool to get through man-made building materials that will fit into the bag I carry. It is the multi-tool of tomahawks..
.
V7. Here is a video from RMJ designer Ryan Johnson teaching a first responder how to use a tactical tomahawk to get into a car to rescue a crash victim.
Here is a list of other uses for a tactical tomahawk as a rescue device. People stuck in their home during a hurricane in Louisiana used a hatchet to chop through the roof of their attic and escape drowning from rising flood waters. Pry bars are recommended tools to keep in earthquake survival kits to help open doors that became stuck during the initial quake and escape a structure before an aftershock hits and the building collapses. Both the spike and the top beveled edge of the T-Hawk can function as a pry bar, with each having the ability to get into different areas.
V8. Here is a story from a father telling how a RMJ Tomahawk was used to save the life of his son and other US soldiers in Afghanistan.
CAMPING HAWKS & HATCHETS: Photo: Cold Steel Trail Hawk, Fiskars X7 Hatchet, Plumb Boy Scout Hatchet. The short handled Plumb hatchet was the common size we used when I was a scout in the 70s. However, the longer 22" handle on the Trail Hawk makes the tomahawk safer to use, since it can be held in two hands for security. If both hands are on the axe handle, then one can't be holding the wood you are cutting, just in case you miss :-). In general, the longer the handle, the safer an axe is to use, since the length of the swing is increased and you are less likely to hit yourself if you miss your target. These kinds of lightweight tools are designed for smaller jobs, such as splitting kindling, rather than taking down large trees.
.
.
Axe Eyes
PH Left to Right: The eyes of a Cold Steel Trail Hawk with the handle in place, a Condor Greenland Hatchet and the empty eye of a Cold Steel Pipe Hawk.
For most of its history, axes were hung by sliding the head up a tapered wood handle through the eye.
.
PH Left to Right: Condor Greenland hatchet, a replacement hatchet handle with both wooden and steel wedges and the Cold Steel Pipe Hawk head above its handle.
.
In video V5 of this essay I mention how the straight poll on the Trail Hawk (left) will not get caught on the beard of another hawk; while the barrel shaped poll of the Pipe Hawk will. This is one of those things you learn while doing experiments with your tools and trying out different combinations of weapon vs weapon.
.
TOMAHAWK HEAD DESIGN 2:
A detailed look at some issues to consider when training to use a tomahawk in a defensive situation.
.
V9. DRAWING A SHORT HATCHET W/ ATTACHED SHEATH
(From the Learning Through Comparisons video)
V10. DRAWING A TOMAHAWK W/ ATTACHED SHEATH
(From the Learning Through Comparisons video)
V11. DRAWING A SHORT TOMAHAWK FROM A KYDEX SHEATH
(From the Learning Through Comparisons video)
V12. DRAWING A KANGEE T-HAWK FROM A KYDEX SHEATH
(Dominant side draw)
.
.
CONCLUSION: One of the reasons I started the Learning Through Comparisons series was to correct a problem. In recent years I’ve watched more and more FMA people pick up weapons from outside general FMA practice, (such as the tomahawk or kukri) and use them with the exact same techniques they had learned in FMA class, without modifications of the techniques required by the differences in the designs of these weapons. Therefore, this series is just as much about how NOT to use these weapons as how to use them.
In comparing three different weapon/tool designs and their functions, my goal is to teach you how to evaluate weapon designs for yourself and take these principles and use them to intelligently compare different things in the future. Learning through comparisons is a technique of learning how to learn and can be used in many areas of life.
]]>
https://pekiti.com/blogs/news/notes-on-blade-design-bowie-kukri-hand-axe2022-09-23T17:20:08-04:002023-03-14T00:51:15-04:00Notes on blade design: Bowie, Kukri & Hand Axe.Tuhon Bill McGrath
Notes on blade design for knifemakers:
Bowie, Kukri & Hand Axe.
Your bladed tool should be: 1. Legal in your area for its intended purpose. 2. Practical for use in the 99% of the time you will not be using it for self defense. 3. Have features that will help in a self defense situation, while not making the knife look like a “fighting knife.”
More on point 3. Names such as Bushcraft, Camper, Hunter, Survival are a bit safer than Fighter, Attack, Combat, Assassin.
Professional big game hunter and writer Robert Ruark said “Use Enough Gun”. When it comes to big blades, I would recommend “Use enough handle.”
One of the pet peeves of mine is when a modern knife manufacturer puts a short handle on a large knife. While a handle that’s too thin can be fixed by wrapping it with grip tape; there is no easy way to make a short handle longer.
Questions to ask about your handle design: 1. Does your handle impede a secure grip: such as being tapered towards the blade, but has no guard (such as a Finnish Puukko).
2. Does it taper towards the butt with no swell or hook at the butt end (such as some older Cold Steel Tantos),
3. Have finger grooves that limit grip choices. Conversely, does it have a round grip, which hinders awareness of where the cutting edge is?
4. Have a historical or traditional handle, but you are selling the tool to modern customers with larger hands.
5. Are your customers unfamiliar in using the style of grip (as specifically the case of the Khukuri/kukri for most of the world outside of Nepal. According to antique arms dealer Matt Easton, some early kukris handles were long enough for a two handed grip by small Nepalese hands of the 17th century. This would facilitate its use as a tool.
The reverse of this is an easy problem to fix. If a handle is too long for you, a well designed handle will allow for an adjustment of hand placement far easier than would a wide hand trying to fit on a short handle.
Here are some sample ways to do this: 1. Have a straight handle but wrap it in the style of a Japanese sword.
2. Have a straight handle with very positive, physical stops at the top and bottom.
ONTARIO SP-10
3. Have a palm swell at the center of the grip.
4. Have an hourglass grip, with a slight reduction in the center and a widening at each end. This is done subtlety on the kriton handle on the Cold Steel Trailmaster.
5. Have a combination of palm swell and end flairs, as found on the Cold Steel kukris.
6. Have ONE finger groove at the start of the grip. Pic
7. Start the handle narrow behind the guard, then gradually widen towards the butt.
Find a balance between large enough to protect the hand and catch his blade; with small enough not to snag on clothing or get in the way of cutting. A longer handle, combined with a cross guard gives you some "stand off" area below the guard for your hand to keep away from an opponent's blade. .
Khukuris:
Note: Khukuri is the Nepalese word for this tool, while Kukri is the Hindi/Indian word. We in the west are more familiar with the Indian word because of the involvement of the British in India.
Kukri: notes on the notch. Religious design. Acts as spring, Helps prevent the focus of torque on the thin cutting edge. I would leave out the center post, so it can be used with a Fire steel. (and mount a firesteel that fits it right on the sheath)
.
Matt Easton on antique Kukri design:
A sixty minute documentary about the thirty year quest by Christian Cranmer owner of International Military Antiques to rescue the contents of the Royal Arsenal of Nepal and over 300 years worth of Antique weapons.
.
Antique Khukuri Repair at KHHI 2017
Napalese using khukuries to dig for the Yarsagumba fungus (cordyceps sinensis) that grows on caterpillars which live under the grass at high elevation in the region. This fungus is used in traditional Chinese and Tibetan medicine.
You'll find 19 useful videos explaining the many uses of the kukri for Bushcraft and Survival on this playlist from Blackie Thomas:
Some pros and cons of using a tomahawk as a combat tool. From Tuhon Bill McGrath of the Pekiti-Tirsia System of Filipino martial arts.
BOWIE VS KUKRI VS HATCHET/TOMAHAWK: Comparing the three in use. (with pros and cons of each)
.
.
I tell my Pekiti-Tirsia FMA students that just because you have training in techniques designed for a straight blade, does not mean you can transfer all those techniques automatically to all other edged weapons. It will take some adjustment, as I discuss briefly in this video. When asked which I would take into a survival situation, I usually reply “That depends what I am trying to survive.” If I was trying to move through or around obstacles in an urban environment, then I would want an all steel tactical tomahawk. (The CRKT Kangee T-Hawk is what I keep in my car emergency bag.)
If I was trying to survive in the wilderness, then the kukri gives you many of the functions of both a hatchet and a machete. Conversely, if I needed a melee weapon, (such as trying to escape a riot, where I have time for only one cut per opponent), then the kukri hits harder than the bowie knives I own, while being far less likely than one of my tomahawks to get stuck in a target. I own a Ontario OKC kukri, as it’s a great camping tool, but would prefer the Cold Steel Gurkha Kukri Plus, if in the riot scenario I spoke of.
If I was trying to survive a knife fight against a well trained, single opponent, (and was limited to the three choices given here), then I would choose a bowie knife because of its maneuverability and its better thrusting ability than the other two weapons.
]]>
https://pekiti.com/blogs/news/progression-through-the-pti-rank-system-a-history2022-07-26T19:49:35-04:002022-10-06T12:52:59-04:00PROGRESSING THROUGH THE PTI RANK SYSTEM: A HISTORYTuhon Bill McGrath
When I started completing the first few curricular blocks, the design of each block made so much sense for both learning and application.
]]>
(PTI Test books. Lt to Rt: Test Book 1, Advanced Test Book, Current test book).
FROM TUHON BILL MCGRATH:
When Tuhon Gaje was learning the Pekiti-Tirsia system as a child from his grandfather Conrado Tortal, there was no rank structure. Young Leo was taught all of one weapon "A to Z" in the order of Solo Baston/Espada (single stick/sword), Doble' Baston/Espada (double stick/sword), Espada y Daga (sword and dagger), Daga y Daga (knife vs knife), & Mano y Mano (hand vs hand).
Leo told us that the names of the ranks he gave us where taken from the public school titles used when he was a child, so an elementary school student was called a "Yakan" (student), while a high school student was a Lakan (lit. "first step"). The school principle was addressed as "Tuhon" (From the Malay "Tuan" lit. "lord" and used for "chief.") Teachers were addressed as "Guro" which of course means "teacher." Mataas is literally "master' and was the equivalent of the Spanish "maestro." Magino'o is a term for the pre-spanish nobility among Tagolog speakers in the Philippines and is used in Tuhon Gaje's rank structure to mean "elder"or "respected person."
Our first test book in PTI was Test Book 1, from 1995. This book covered all the rank material up to Guro Isa (Instructor, 1st level). I based the requirements of each rank approximately on the material I had learned when I was given each rank by Tuhon Gaje. The times listed in the chart were my approximations of how long a student should practice each set before they might be ready to test in that material. The belt rank equivalents came from requests by seminar hosts to show their students how ranks in PTI would correlate with ranks they were already familiar with.
The two major changes from how I learned the system were the addition of the 5 Attacks Subsystem (1) at the beginning of the curriculum, and the move of the Pekiti-Disarma from the end of the solo stick/sword material to a place in between the 64 Attacks drills and Seguidas. When I had first showed the proposed rank chart to Tuhon Gaje, he asked that the Disarma be moved to its current place in the curriculum, so it would act as a gatekeeper for Seguidas; ("If they can get through Disarma, then they will deserve to learn Seguidas." was how he phrased it at the time.)
TEST BOOK ONE RANK CHART
The Advanced test book covered the ranking requirements from Guro Delawa through Tuhon.
ADVANCED TEST BOOK RANK CHART
Interior of new test book.
NEW TEST BOOK
The current test book is a spiral bound booklet that shows the requirements for all ranks in PTI and contains the following changes:
Things removed: The sash/belt colors were removed as most FMA schools don't use this system. Also removed were the training time suggestions, as few people train in the 4 to 8 hours a week format those suggestions were based on.
EYD changes: In the old test books, EYD set 2 material was split between Guro Isa and Guro Dalawa. In the new test book, all the EYD 2 requirements have been put into the Guro Dalawa section.
Spear: Tuhon Gaje had only taught me the first two sets of spear and told me I should be able to figure out the third set on my own. Since the spear sets were based on Seguidas, (or maybe visa versa, see note 2), this seemed workable when I first learned them. However, I decided I probably should have help on this, so I waited until I had several instructors in our group who had all three sets of Seguidas before working on this set.
Doble' Daga: It was common for Tuhon Gaje to teach a set of Espada Y Daga and then teach the double knife versions of the same material while training us on variations. While this did help reinforce the gross motions of each technique and gave you a deeper understanding of the material, it proved to be extremely time consuming to teach this way. When I was teaching small private groups at the same pace I learned the material (often one technique per hour), all went well. However, when I tried to fit all of a EYD set (12 attacks, 12 disarms, 12 Contradas & 12 Recontras) in a weekend seminar, along with all the corresponding double daga work, it always seemed that I had to "rob Peter to pay Paul" between the two weapon systems.
I've also learned to be increasingly careful about teaching Pekiti knife work as the years go on and thought it wise to separate the double knife work from the Espada y Daga material.
Much like Tuhon Gaje made Pekiti Disarma the gatekeeper for Seguidas, I decided that the EYD material would be the gatekeeper for Doble' Daga. Therefore, the other change I made in the new test book was to reflect how I now teach Doble' Daga today and reserve it for those with a career path towards learning the full Pekiti-Tirsia system.
PTI RANK REQUIREMENTS (Newest version)
YAKAN - FULL STUDENT Tempering and Kickboxing, Solo Baston 5 Attacks Subsystem, Doble’ Baston Basics, Empty Hand vs Knife
LAKAN - FIRST STEP Solo Baston Abcedario, Abcedario de Mano
LAKAN GURO ISA - ASST. INSTRUCTOR LEVEL 1 Solo Baston 64 Attacks, Doble’ Disarms, Solo Daga Levels 1, 2 & 3
LAKAN GURO DALAWA - ASST. INSTRUCTOR LEVEL 2 Pekiti Disarma, Doble’ Contradas & Recontras, Pekiti de Mano
GURO ISA - INSTRUCTOR LEVEL 1 Seguidas, Espada Y Daga Level 1,
GURO DALAWA - INSTRUCTOR LEVEL 2 Solo Contradas, Espada y Daga Level 2,
GURO TATLO - INSTRUCTOR LEVEL 3 Solo Recontras, Espada y Daga Level 3
NOTE 1: I developed the 5 Attacks subsystem back when I was doing followup seminars for Tuhon Gaje in the 1980s. The idea was that most weapon based arts I encountered had the same basics; four diagonal cuts and a thrust. Therefore, if I could use that format as a template, I could add more advanced Pekiti principles on top of something these other arts were already familiar with.
NOTE 2: If you have trained in Seguidas, you may have thought that some of the techniques seemed a bit strange to use with a baston or sword. These techniques make a whole lot more sense when used with a spear. This leads me to wonder which was the chicken and which the egg between Seguidas and spear.
Train Hard, but Train Smart,
Tuhon Bill McGrath
FROM TUHON JACK LATORRE:
When first coming to the system in 1993 or so and seeing this chart, I was very excited to undertake this system. When I started completing the first few curricular blocks, the design of each block made so much sense for both learning and application. After starting some of the intermediate material, I was drawn in by the level of detail and efficacy. But seeing what was required of each new block, it seemed almost daunting to learn everything. Sticking with it and having the guidance of Tuhon William McGrath and the cooperation of my classmates really made for a quality and enjoyable experience. Going through the rigorous and detailed testing of knowledge and application required of each block not only confirmed the quality of training, but brought more and more connectivity between curricular blocks. In 2003, upon completing successful learning of, training in, and testing of the entire system, it became apparent to me that I was a merely a beginner in the system. Now I had a finished road map that I had been piecing together from parts I had been given from which I could begin to REALLY explore...to draw parallels between blocks, to distill technical essence from the physical exemplars given. Also, I learned to improve my methods to explain and teach others what I had been given and worked for. 2017 was the promotion of Scott Faulk and I to Tuhon rank. One of the many things that made it odd compared to us testing out of the system for our Mataas Na Guro ranks was that there was no test. Tuhon McGrath simply thought both Scott Faulk and I were ready. Neither Scott nor I thought we were ready for such an honor. But what came to pass afterwards helped to add perspective. Both Scott and I became more involved in leadership roles...to help make decisions for the improvement of the organization, of the student body, and of our diplomacy in the greater FMA world. Scott and I were making more connections for ourselves as to how the system could be taught, how it could better serve the membership, and how quality could be maintained as we grow as an organization. Both Coach Danny Terrell and Mataas Na Guro Christophe Verdot became part of the process and now we have a PTI Council to help guide you all. After going through the system, looking at this chart is a fascinating practice. All PTI members are somewhere on here in varying degrees. Your jobs are to learn the most salient parts to you in a quality and ethical way. Look at it closely and carefully. It is a sort of mountain to climb...with several paths you can navigate. What the PTI Council does is help you figure out which paths are best for you...what you might experience going one way or another on divergent paths...what paths are more "scenic" and which paths are more "direct"...and what's to be gained by following certain paths. With the COVID-19 health crisis, our paths might alter some...but they are still paths nonetheless. We will help you progress in whatever way we can. There are the downloads of Tuhon Bill, free video tutorials that Coach Danny and I make, Zoom classes that some of the assistant instructors and Certified Trainers do, and this Facebook group. You can still progress. Looking at this chart makes me envious of the paths you are on.
Wishing each of you health, safety, and sanity.
Jack A. Latorre Tuhon Executive Director Pekiti-Tirsia International
]]>
https://pekiti.com/blogs/news/an-introduction-to-set-3-of-pekiti-tirsia-espada-y-daga2022-07-22T23:44:22-04:002024-06-23T11:05:38-04:00AN INTRODUCTION TO SET 3 OF PEKITI-TIRSIA ESPADA Y DAGATuhon Bill McGrathMore]]>
Here is Tuhon Jack Latorre’s introduction to his notes for set 3 of Pekiti-Tirsia Espada y Daga. Tuhon Jack will be teaching EYD set 3 during each afternoon session of this year's PTI Summer Camp in Brockport, NY.
FROM TUHON JACK LATORRE:
In this section of the curriculum, Espada Y Daga (sword and dagger) combat is explored as both combatants have their Dagas held in pakal (icepick grip). Because of the mutual orientation and the danger of the grip, the practitioner generally seeks to use the longer weapon to foil the opponent's pakal techniques, or to avoid the opponent's pakal hand altogether. This course of study generally requires some degree of proficiency in Espada Y Daga Levels One and Two (and their prerequisites), as well as Daga Level Three. As is with the Espada Y Daga curriculum, Level Three enables the practitioner to improve in other areas, most notably in single stick, empty hand and double knife. The Drills lay down the foundation for some the basic theory used against the sword and pakal dagger, using angles one through four. The Attacks teach the practitioner how to interweave the sword and dagger offensively, how to use footwork in conjunction with knife tapping to avoid being hooked, and how to bait using the knife, among other ideas. There is a more prevalent use of deception concerning the pakal hand, as the practitioner wants to avoid getting caught in mutual hooking/ripping situations. This is a set of twelve combinations. The Disarms resemble the Level Two disarms, as there is one set of twelve: six disarms against the sword/stick, six disarms against the pakal dagger. The six sword/stick disarms are identical to the first six disarms of Level Two…the remaining six are different because the scenario is pakal versus pakal. The Contradas are twelve "applications" that follow the quick, multiple-hit theory with various points for disengaging from the opponent or switching applications depending on what the opponent does. The Recontras are twelve "applications" that follow the timing-dependent, full-body commitment of its predecessors, usually ending with a takedown, break and/or power hit. After proficiency is gained in this area, any form of pakal fighting can be improved with the content learned. With this in mind, the correlation between double pakal fighting and empty hand combat is also strengthened.
Tuhon Bill McGrath and Guro Jens Thomsen demo techniques 1 & 2 from Pekiti-Tirsia Espada y Daga set 3 Attacks at the Kenpokan Dojo in Hannover, Germany.
Understanding the knife jab in Pekiti-Tirsia. With Tuhon Bill McGrath and Guro Zoltan Juhasz in Szolnok, Hungary.
Draw number 1 from the PTI Warm-Up video for Espada y Daga set 3.
The PTI video, "Espada y Daga set 3 Warm up." is 34 minutes long and contains a solo training warm up from Tuhon Bill McGrath and a two man practice warm up from Tuhon Jack Latorre. The price of this video has 3 levels: 1. Free for those attending the 2024 PTI summer camp. 2. $26.50 for PTI members using their 2024 member discount code when ordering. 3. $35 for non-PTI members. For more info, visit: https://pekiti.com/products/warm-up-drills-for-espada-y-daga-set-3
]]>
https://pekiti.com/blogs/news/weapon-disarms-in-the-pekiti-tirsia-system2022-06-21T01:18:41-04:002024-03-22T00:58:15-04:00WEAPON DISARMS IN THE PEKITI-TIRSIA SYSTEMTuhon Bill McGrath
First, some general principles:
1. Train as if your opponent’s weapon is a sword. Therefore, your first move should not be to grab his blade. 2. A disarm is much easier to do if you first do some damage to the hand holding the weapon, or to the mind controlling that hand.
Grand Tuhon Gaje would emphasize over and over again that you should not “hunt” for a disarm, but recognize the opportunity for a disarm once you get a disabling hit or cut to the opponent’s weapon arm or head. The reason the Disarma set is so large and has so many techniques, is that an opponent’s hand may be at different angles after you strike or cut him and therefore you need different disarms and angles of approach to successfully disarm him.
NOTE: There aren’t really that many techniques once you understand what you are doing in the set. You really have just a few actual disarms and are just using them a bit differently depending on the angle. It’s like a carpenter having 3 types of hammers, 3 types of saws and 3 types of measuring devices. So while he has 9 tools in his toolbox, it’s really only 3 categories of tools.
.
(Disarm angles on sector 1)
Disarms in Pekiti-Tirsia are not taught as “goal” techniques in a fight. The goal is not to disarm an opponent per se, but to control the danger you are in. A disarm is simply one tool in your toolbox to help you reach your goal.
In the classical style of teaching Pekiti-Tirsia; techniques such as disarms are first taught in isolation, with just the main mechanics of each technique, to get the motions ingrained so you can do them while under stress. This is the “how” of the technique. (This teaching order presuposses that you are already proficient at hitting an opponent before learning how to disarm him).*
(All 5 sectors of angle 1)
After the main disarms, you will then learn the counters and recounters. This process helps you learn the principles behind a technique: the “why” of it, as in “why is it done this way and not another.”
(Counters & Recounters on sector Angle 1)
A counter to a "Snake" disarm of a stick. A disarm is much easier to accomplish if a hard strike is given to the opponent first. This is especially true in disarms like the snake, which are done at grappling range.
NOTES
My teaching notes for Pekiti-Disarma: Solo Stick/Sword disarms. (for a translation, see your local PTI instructor)
(1). CCW (X STICKS) 1. FL 1, SHOULDER DIS 2. BRKN 1, FOREARM DIS 3. BRKOUT, IWL LEVER STICK W/ RT FORARM 4. IWL TO POOLCUE 5. DISCO DISARM
(2). CW (X STICKS) 1. 2 SLASH, 9 THRUST ROLL TO DF DIS 2. OWL, 8 THRUST TO PUNYO TO DIS 3. LIKE 1 X 1 4. LIKE 2 X 1 5. CATCH WRIST, THRUST TO CLOSING SCISSOR DIS
(3). CCW (2 SLASH HAND) 1. 2 HACK ARM, LIKE 1 X 1 2. LIKE 2 X 1 3. LIKE 5 X 1 4. IWL RAISE THEN DROP DF
(4). CW (4 SLASH HAND) 1. DIRECT GRAB INSIDE PUNYO, OWL W/ THUMB DOWN, 8 TH DIS 2. ENTER OVER STICK, OWL PALM UP, BRKOUT DIS 3. ENTER UNDER STICK, OWL PALM UP, BRKOUT DIS 4. DIRECT GRAB PULSE, ELBOW BREAK, STRIP TO REV GRIP
(5(. (2 INSIDE, 2 FROM GRAB ELBOW) 1. UMB 3, 2 X 1 DIS 2. 2 TO WRIST, 1 X 1 DIS 3. LT-RT PASS, OWL LIKE 1 X 4 4. RT ARM PASS, OWL LIKE 2 X 4
(8). (2 INSIDE, 2 OUTSIDE) 1. SLASH 2, LIKE 3 X 1 2. FLOR 2, SLASH 2, IWL, 9 FROM OS, DF IWL 3. 9 SCOOP- 2 SLASH WRIST, LT HACK FINGERS & GRAB, STRIP DIS 4. 2 SLASH WRIST- SCOOP 9-2 SLASH WRIST, LIKE 5 X 1
(9). (2 INSIDE, 2 FROM GRAB ARM) 1. UMB 1, LIKE 2 X 1 2. 1 TO STICK, LT CATCH, PULL TO RIBS 3. FROM ECHECETTE, LIKE 1 X 2 4. FROM CHECETTE, LIKE # 9 DOBLE’
After teaching the core disarms, counters and recounters, the next stage would be to integrate them with strikes, so they can be used more effectively. This is the beginning of learning the “when” of a technique, i.e. using it at an appropriate time in a fight.
Here is an explanation of one way to teach the timing of striking.
SAME PRINCIPLE-DIFFERENT TOOLS
Some samples of Doble' Baston Disarma and the knife versions of the same principles. The classical way of teaching Pekiti-Tirsia will often show the same general technique with several weapons - as a way to reinforce the gross motions on the nervous system. Therefore, we will teach the same disarm with a long weapon such as stick vs stick, then a short weapon version such as knife vs stick, then the empty hand vs stick version. The idea here is to teach the student how to make adjustments as needed with the same general principle, but applied with different weapons: to show which things change and which stay the same.(2)
Timing in Espada Y Daga is far more complex than in single or equal length double weapons.
Time is an important factor in a fight. “How much time do I have to deal with Bad Guy 1 before Bad Guy 2 can get to me?” If you have time for only one hit before you need to leave and this only stuns Bad Guy 1, then maybe taking his weapon away as you go past him is a good option to have in your toolbox. Do you want to leave a temporarily stunned,(1) but armed man behind you as you make your escape, or an unarmed man?
(The classic way of teaching a blade reversal disarm)
When I train law enforcement or military personnel, I don’t have the same luxury of time as I do in my martial arts classes. With these two groups I must compress things down quite a bit and tend to teach in what I call “Chain Techniques” with a sample from each principle in each combination, such as: 1. Avoid the initial attack. Than an entry to get into a superior position. 2. Just enough strikes to buy time for a control technique. 3. The control technique: (defined as something capable of seriously reducing his ability to fight for a prolonged period). such as a break, lock, choke, disarm, or drawing and/or use of your own weapon.
Teaching a "chain entry" knife defense. This is used when I don't have the time to teach the classic way of compartmentalized training (where each subject is worked on until near perfect and then assembled into a complete whole.)
Which way of teaching is better? I believe if you have the time, then the old ways will produce the better overall fighter and teacher. However, if you don’t have the time, then you have no choice and the new way may be the only way available.
I hope this has helped you understand the subject of disarms in the Pekiti-Tirsia system.
Train Hard, but Train Smart, Tuhon Bill McGrath
*When Grand Tuhon Gaje first learned the Pekiti-Tirsia system from his grandfather Conrado Tortal in the 1940s and 50s, each weapon was taught one at a time. This means that he went through all the material in solo stick/sword “A through Z’ before moving on to the double stick/sword material. The disarms were the “Z” techniques of solo stick/sword, given at the very end of the training of that weapon category. When I finished learning the system, I presented him with a proposed course outline, showing the way I thought I should teach the system. This was based on the order in which he had taught the system in the US, which was very different than the way had learned it from his grandfather. (Instead of each weapon “A through Z”, we learned it closer to all the “A” techniques of all the weapons, then all the “B” level techniques for all weapons, etc.) Leo had me change the teaching order so the Solo Disarma now stood between 64 Attacks and Seguidas, as he wanted a buffer between the basics and the advanced material in the system. (He said "If they can get through Disarma, then they deserve to learn Seguidas"). For most modern students, when you train on the Disarma, realize that you are learning this subsystem with far less striking and cutting techniques than did Leo when he had learned it, as well as his first group of students in the US. Therefore, be patient and train lots of striking material before you attempt a disarm during sparring.
]]>
https://pekiti.com/blogs/news/eddie-jafri-and-the-golok-eddie-stories-part-32022-05-22T01:39:43-04:002024-09-28T00:04:15-04:00EDDIE JAFRI AND THE GOLOK (Crazy Eddie stories part 3)Tuhon Bill McGrathMore]]>
Three Indonesian Goloks (1)
.
Two Training Goloks; a wooden one given to me by a student and a polymer one based on the wooden model made by Vulpes Training (2).
WHAT IS A GOLOK?
The Golok of Indonesia is a large, stout knife, comparable in use to the Parang of Malaysia and the Bolo of the Philippines.
While Google and Youtube will translate golok as “machete,” it’s really a different tool than what we in the west would think of when we use that term.
The modern, Latin style machete we are familiar with in the Americas has a blade of thin stock, most often of a uniform thickness throughout. This is to keep this agricultural tool both inexpensive to purchase and light in weight for long use in the fields, or when clearing a trail of vegetation. The handle is usually straight, with a rectangular cross section with chamfered edges.
Meanwhile, the golok usually has a blade of heavier construction, with a thicker spine that often tapers to the tip. The handle is often of a pistol grip-like shape, curving downward towards the butt. This handle is often round or oval in shape. Shown below are a Collin’s machete with a straight grip and thin spine and a Bidor parang with a thicker spine and pistol grip type handle. The Malaysian parang serves the same purpose as the golok as a jungle knife, (as do many of the bolos in the Philippines).
Notice the difference in spine thickness between the machete and the parang.
COMPARING BIG BLADES: LATIN MACHETE VS S.E. ASIAN
Why the difference between designs of Latin machetes and the jungle blades of S.E. Asia? A large reason is the type of vegetation each is designed to cut. In Central and South America, the purpose of the machete is to cut light vegetation for long periods of time; either working in agriculture, or clearing a trail in a jungle. Thin, green vegetation, (such as grass or vines) does not require a heavy blade to cut effectively. When we move to S.E. Asia though, much of the work is done on much tougher to cut bamboo, (so much so that anthropologists used to refer to many of the indigenous peoples of the region as “bamboo cultures,” due its ubiquitous use among the people there.)
The Collins machete has a blade of 17 & 3/4 inches (45 cm) and weights 14.8 oz (420g), while the blade on the Bidor parang is shorter by 3/4” (1.9cm), but weights more, at just over 1 pound (515g). The weight difference between the two is explained by the blade stock of the machete being much thinner, at one 10th of an inch or around 2.5mm, while the parang is 1/4 inch (6.35mm) at its thickest. On the tropical hardwoods of S.E. Asia, the thicker blades of the region are less likely to get stuck in wood than the thinner blades used in Latin America, which are intended for use on lighter vegetation. All this makes each blade type very well suited for the environment it is needed to work in.
EDDIE’S GOLOK TECHNIQUE
Here is a look at a few techniques of Golok use I learned from Eddie Jafri in the late 1970s and early 80s. First let’s look at the differences between what Eddie would show at a public performance of Silat and what he would teach in class.
.
Bunga (flowers) vs Bua (fruit):
The video above shows Eddie during a Silat demo in 1980 or 81. The golok material is during the first 30 seconds. (The knife held in his toes is a Rencong, (3) and yes, they really did use it that way, usually kicked into the groin as a distraction when paired with a sword).
Getting back to the golok, notice the reverse grip slashes Eddie is doing with the blade. Yes, he’s moving fast and it looks scary, but this material is meant mainly for public performances. (By the way, Eddie would usually use a cheap, lightweight kitchen knife for this demo. That's why you see him toss it aside instead of sheath it, before he draws the rencong). This style of performance is called “Bunga” lit. “Flowers” in Indonesian and it is intended for public display, not for fighting. The actual techniques would traditionally be hidden and would be referred to as “Bua” lit. “fruit” ie, the real fighting aspect of the art.
The techniques Eddie taught were based on the idea of drawing the golok in reverse grip to deliver faster cuts and hacks straight out of the sheath. These are often reinforced by holding the spine of the blade along the forearm. .
The video above shows an empty hand version of one of Eddie’s golok techniques. He would often show the empty hand version of a knife technique first, wanting us to get the gross motions practiced, before moving on to the actual weapon techniques.
Here are two videos from Indonesian Silat instructors that show some concepts similar to the drawing techniques I learned from Eddie.
I rarely teach the full version of Eddie’s golok technique these days, (karambit seems to be more popular) but I have integrated some of its principles into the weapon retention material I teach to LEOs and CCW civilians.
Note: I am usually reluctant to show this kind of material in public; but I figure none of my LEO or CCW students are likely to carry a foot long golok as their weapon retention tool, so we should be good on this.
Here are a few samples: First, the empty hand version.
An attacker attempts to grab my sidearm on my right hip. I use the hand I draw with to secure the firearm in place, while striking him in the face with an open hand technique to prevent damage to my hand. (5)
If he is too close for a hand strike, I will use an elbow.
Once I have gotten a good hit into his control center, it's time to hit the radial nerve in his forearm and try and loosen his grip on my firearm.
If he's still fighting, I can deliver a hammer fist to his face. This will bring my hand back to my left side where my weapon retention tool is kept.
If I have the chance, I can draw my blade and deliver the same gross motions as the empty hand version of the technique.
At arm's length, I can deliver a punch with the pommel to the face.
Closer in, I can deliver a reinforced elbow strike and cut with the golok to the head.
I can now work on his forearm to make him release my firearm.
A backhand to the head or neck is available if needed. (6)
Train Hard, but Train Smart, Tuhon Bill McGrath
NOTES: 1. Goloks on the Indonesian version of Etsy. The price when converted into US dollars is about $10 each. https://www.bukalapak.com/p/hobi-koleksi/koleksi/benda-tajam/cry9uh-jual-golok-betawi-gagang-bonggol-bambu-baja-per
]]>
https://pekiti.com/blogs/news/learning-through-comparisons-pt-2-drawing-the-weapon2022-04-16T01:38:26-04:002023-04-17T11:27:49-04:00LEARNING THROUGH COMPARISONS PT 2 DRAWING THE WEAPONTuhon Bill McGrath
The purpose of this series is to learn how to learn; ie the teachnique of learning something new. One way human beings do this (especially when young) is by learning through comparisons. In this essay we will examine the differences in drawing three categories of weapons; the bowie, the kukri and the hatchet/tomahawk.
The purpose of this series is to learn how to learn; i.e. the technique of learning something new. One way human beings do this (especially when young) is by learning through comparisons. In this essay we will examine the differences in drawing three categories of weapons; the bowie, the kukri and the hatchet/tomahawk.
BOWIE KNIFE:
Drawing from carry position 1. This position has the sheath on the strong side hip (My right side).
Three stages dependent on time; close, medium and far ranges.
Drawing from carry position 2. This position has the sheath inside the waistband with the knife concealed.
Three stages dependent on time; close, medium and far ranges.
Why these guards? One of the principles I teach with all weapon work is how not to hurt yourself with the weapon and this starts with the draw.
Low guard: This puts the point on target as early out of the sheath as possible. By bringing your weapon hand to your hip, it helps ensure that the point of the knife is not pointed at your body. Just like you don’t want to point the muzzle of a firearm at any body parts you are fond of, you don’t want to do anything similar with the point of a knife. This is the fastest guard to deploy and therefore a good choice when defending against a sudden attack at close quarters.
Middle guard: This gives you more control over the weapon, which is useful if you are trying to move a heavy weapon at speed and if your opponent tries to knock your weapon aside. The left hand on the wrist is there to add power to your cuts, but also to act as a last-ditch bit of protection for the wrist of the weapon hand. This position is also good during transitions to other guards from the draw, as the support hand on the wrist helps keep the blade a safe distance away from your face. This helps prevent a problem I have seen during sparring, when students hold the knife in a single hand middle height guard (similar to a sport fencer’s). I’ve seen students in full contact matches pop themselves in the face mask with the point of the training knife, when someone has cut towards the knife and they react by snapping the knife arm back.
High guard: This guard is useful when defending against an attacker at a distance. Having a high guard allows gravity to help you deliver faster cuts (useful when you have a heavy blade). It also gives you a clear battle plan “He is likely to attack below my knife, so I will counter-cut from above.” The less areas you have to react to, the faster your reaction time will be. The high guard also helps prevent you from cutting your head when you make a backhand cut (something that can happen if your hands are held next to your head while you hold the knife).
Carry Positions 3 & 4 have the knife on the support side (my left) and presume you have a handgun on your strong side. The techniques here are designed to defeat a grab of your handgun. Since I usually show this material to law enforcement and CCW holders during seminars, I will not show it here.
KUKRI / KHUKURI
A Khukuri I purchased in Nepal in 2018
Two of my favorite kukris: A Nepalese made Khukuri from Knives by Hand and a Cold Steel Gurkha Plus Kukri in O1 tool steel.
Note: The English word Kukri comes from the Hindi word for this knife: while Khukuri is the Nepalese word for this knife.
Drawing the Kukri from the strong side. As with the bowie, the guard you go to after the draw depends on the time you have and conditions you are in.
Drawing the Kukri from the cross-draw position.
Comparing the thrust on a straight blade, such as a bowie, and a curved blade, such as a kukri. If you have been trained with a straight blade to do hooking thrusts, you may need to change your technique when using a curved blade.
As I said at the beginning of this essay, the purpose of this series is to learn how to learn. Therefore, keep an open mind about all you see here, analyze and evaluate, and above all use this as a tool to help you learn the art of learning.
]]>
https://pekiti.com/blogs/news/what-i-did-on-my-summer-vacation-crazy-eddie-stories-part-22022-04-09T23:22:13-04:002024-09-27T23:12:37-04:00“WHAT I DID ON MY SUMMER VACATION” (Crazy Eddie Stories part 2)WILLIAM McGrathMore]]>
I first met Penchak Silat instructor Suryadi “Eddie” Jafri in June of 1978. He had come to watch a Philippine Independence Day festival in lower Manhattan because he had heard good things about Filipino martial arts and wanted to see if some would be demonstrated at the event.
Tuhon Leo Gaje and his students were there and after our demo, Eddie came up to him, introduced himself and the two started to talk. The two hit it off and this led to Eddie being invited to teach a Penchak class at Leo’s school. Tuhon Gaje told us that he had studied Mustika Kwitang Silat during his travels as a young man and was familiar with the ideas of Silat. “Out of this world techniques” is how Leo would describe Silat and we soon learned what Leo meant by this.
Here are two stories that may illustrate why Eddie's nickname among us was“Crazy Eddie” and help illustrate the culture that Eddie and Silat came from.
Eddie grew up in Painan village in western Sumatra, where his father owned a small grocery store. Eddie had heard stories of Penchak Silat among his relatives, but his parents did not want him to train in the art, because one of his uncles had won a tournament and was later poisoned by the loosing side. (Eddie eventually started his training by sneaking off after school at the age of 13).
Life was not so safe at home though, even without Silat tournaments, as there were tigers that you had to be wary of when traveling between villages and poisonous snakes such as cobras, which would come into the village at night looking for prey. Even play among the children of the village was not without its dangers.
Here’s an example:
I would bet that many of you reading this had some type of water pistol as a kid. My guess is that if I asked you what you put in that water pistol, you would answer “water.” Well, Eddie and his friends would put vinegar in their water pistols. But this stuff was not the same kind as you buy in your local supermarket. Eddie told me that the vinegar they had back then was home made and so strong that if you put it on your skin it would raise a welt. But that was not good enough for the kids of Eddie’s village. They would take hot chillies, crush them and soak them in the vinegar for a few days, then strain out the chillies and put that infernal liquid into their water pistols. They would then run through the village, shooting each other, burning each other’s skin and having a great old time. Eddie said that they had to stop using that mixture when he accidentally hit his best friend in the eyes with the vinegar spray. The poor kid fell to the ground screaming. Eddie thought he had permanently blinded his friend, especially after his eyes swelled up “as big as a hard boiled egg!” was how Eddie described it. His friend eventually healed and regained his vision, but that was just how they played as a child in a village in Indonesia in the early 1960s.
Eddie told us that he had left Indonesia and got to the US by getting a job abroad a cargo ship as a cook and basically “jumping ship” after shore leave when it docked in New York. He had some experience on ships prior to this though.
I remember a conversion several of us young guys had with Eddie one day before class. We were sitting around talking about what jobs we would get during summer vacation and talked about the jobs you would expect high school kids to have in 1970s New York; working at a grocery store, neighborhood pizzeria, etc.
“Hey Eddie” we asked, “Did you have a summer job when you were in High School.”
“Yes, I was a pirate” said Eddie, mater-of-factly.
“Oh come on Eddie, you were not a pirate.” we replied, thinking he was joking.
“Well, our gang had a small boat and some machine guns and we used to go and stop small cargo boats running between islands and steal their coffee, sugar and tobacco and sell this on the black market.”
“Eddie, you really were a pirate!”
“Yeah, I was a pirate.”
More stories to follow. In the meantime, here is a drill from Cimande Silat that Eddie taught us. Our warm up each class with Eddie consisted of 100 body weight squats and 100 Cimande punches. The video shows some details on this punching drill.
Train Hard, but Train Smart (and don’t be a pirate!),
]]>
https://pekiti.com/blogs/news/weapon-vs-empty-hand-diagrams2022-02-12T02:25:43-05:002023-06-28T15:45:55-04:00Can you recommend a Graphics Program to Illustrate Fighting Techniques?WILLIAM McGrathMore]]>
For many years I have been diagramming Pekiti-Tirsia weapon techniques. I was even able to do this in the days before home computers, drawing by hand, since my diagrams were so simple (mainly just a series of lines, arrows and numbers). However, I have not been able to create diagrams of empty hand techniques as easily. I really should do a better job on the empty hand side of this, so I have a request. Can you recommend a graphics program that will help me improve my diagrams and have them show the empty hand techniques more clearly?
Please look at the two sections below, (a knife combo and a boxing combo) each with a video and corresponding set of diagrams.
The knife section shows how I’ve been working for years. The diagram is simple and easy for my students to understand.
The boxing section has my first attempt to diagram an empty hand technique. One problem I’ve run into is that the diagram style I used is ok for punches done on the horizontal plane and at the same height. However, I’m not sure how to diagram a combo that has hits to different heights and on different planes (for example, how would I add an uppercut to the combo shown here).
I did these diagrams with an overhead viewpoint as it helps to show where the footwork needs to be. The problem with the overhead view is that hits to the body are hidden by the opponent's arms.
My goal with these diagrams is to make it easier for non English speakers to follow what is happening on my videos. I've had many comments on my Youtube channel from those not proficient in English that suggests that they are having trouble understanding my verbal descriptions of the techniques shown in the videos.
If I had any skill at drawing, I could show fighters from the side, like this illustration Guro Dan Inosanto drew for Bruce Lee's "Tao of Jeet Kune Do."
Is there a graphic arts program that would allow a non-artist like myself to do this type of drawing with my iPad or desktop? One of my main goals here is to be able to do all the work by myself and not pester my artist friends. The program I am currently using is Publisher Lite, but as you can see from my diagrams below, it is limited to very simple shapes.
Thanks for your help, Tuhon Bill McGrath
KNIFE & EMPTY HAND DIAGRAMS
Here is a video showing a simple three count knife combo I've used many times in sparring.
Here is how I would diagram this combo in my notes.
Here is a simple three count boxing combo.
Here is my first attempt at diagramming the same combo.
Here is a separate footwork diagram, showing the footwork of the boxing combo in sequence.
One of the things I actually like about my crude diagram, is that it allows me to show the correct relationship between the center line of target and power generating shoulders of the two fighters.
In this version of the boxing diagram I have added a red line showing the angle of the point of percussion on the target and the weapon side shoulder. You will notice that the line is not at the center of the shoulder. This is because the line begins where the shoulder meets the chest (or more precisely, where the front head of the deltoid meet the pectoral muscle).
Please notice the following: During the jab, Red’s left shoulder is in line with Blue’s center and 90 degrees to the chest. During the cross, Red’s right shoulder is in line with Blue’s center and 90 degrees to the chest. During the hook, Red’s left shoulder is in line with Blue’s center and 90 degrees to the chest.
Put your fist on target during a left jab. You will have the most support from the shoulder to the fist when the arm is lined up at a right angle to your chest. Your follow through is an extension from that right angle. Now turn your fist into a front hand hook. You will have the most power and the safest position for your shoulder joint, if they stay in that right angle alignment with your chest, even though the elbow is outside that angle. You have to be careful not to open the angle between shoulder and fist too much on a hook, so that you do not damage your shoulder joint.
Here are some photos to help show how the fist is lined up in relation to the chest at the point of percussion during a strike. This is based on my first year of training with Tuhon Gaje, when I was being taught basic kickboxing. Many of the finer details came when he was training me for tournaments with an emphasis on hitting his very dense heavy bag, which was filled with a mixture of sand and clay.
THE JAB: At the impact point, a line runs from the deltoid/pec juncture (marked by my back hand), to the first two knuckles on my fist. Your will have the most support for your shoulder joint at a 90 degree angle chest to arm, but follow through can continue to 45 degrees and still have good shoulder stability.
Care must be taken not to completely straighten the elbow. This can damage the elbow joint, either on impact, or if you miss the target and the elbow overextends. The advice from both Tuhon Gaje and my Silat teacher Eddie Jafri on this subject is not to let your arm go beyond the natural bend it has as it is hanging down at your side when standing relaxed.
LEAD HAND HOOK: On the lead hook, the fist turns over at a 45 degree angle, so that the pinky is up and the thumb knuckle is down, with the elbow slightly bent more than it is in the jab. The wrist is angled inwards to strengthen the wrist during impact. The impact point is on the forefinger knuckle in bare handed fighting and the top of the fist, if under boxing rules with wraps and gloves on. The 90 degree angle from chest to fist should be maintained on this punch to avoid damaging your shoulder. We used a head sized sand bag when practicing this punch.
REAR HAND HOOK: Here the point of percussion occurs when the fist is in front of the center of the chest. The fist canted about 45 degrees out as a compromise between protecting the pinky knuckle from impact (as is the danger in a horizontal position) and the wrist from collapsing (as is the danger in a vertical position). In bare knuckle boxing, this position also helps protect the secondary knuckles from impact with the target. The elbow should be in a line behind the fist on impact.
ELBOW STRIKE: The point of percussion on a horizontal elbow strike has the hand in front of the center of the chest. On soft targets, the bony tip of the elbow is the impact point. On hard targets, the impact point should be moved two inches or so down towards the thickest part of the forearm.


 .
.


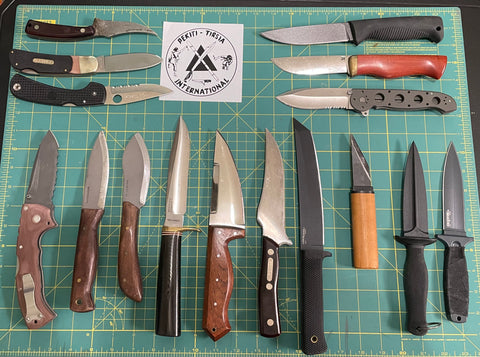


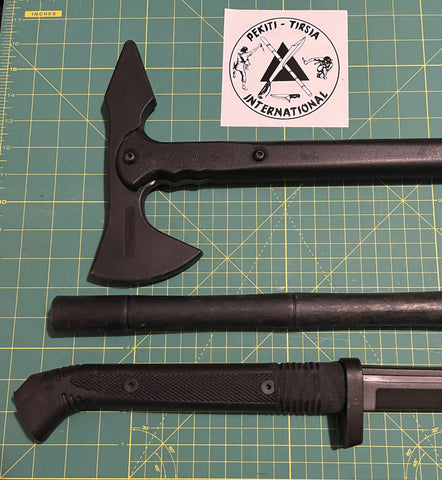
 .
.